
Back in 2017, we converted our 2007 Mercedes Sprinter into a camper van to travel in full time. At that time, we were on a very tight budget and we didn’t know if traveling full time was really for us. We spent around $40,000 (including the cost of the van) to build out our camper van.
Fast forward to 2021, and things have changed quite a bit. We sold our Sprinter camper van and wanted to build a new camper van. This van would serve as both a personal camper for Nate and I, and also as a show vehicle to take to expos for EXPLORIST.life. So, we got on the looooong wait list for a 2021 Ford Transit 3500 AWD and started planning our camper van build.
For me, the most important part of planning a camper van conversion is the cost. We knew we would be spending quite a bit more money on this camper van, and there was a lot we learned from our 4 years on the road in our Sprinter. In this post, I’ll break down the total camper van conversion cost, complete with a detailed list of expenses and steps.

This build was indeed quite expensive, so I’ve also included some alternative less expensive options below. Some of the things we did in this van were not necessary or we did for testing purposes and ultimately decided they weren’t worth it *cough cough… Lizard Skin…* Disclaimer: I cannot vouch for the cheaper alternatives personally, as we haven’t actually tested most of them.
Camper Van Conversion Costs:
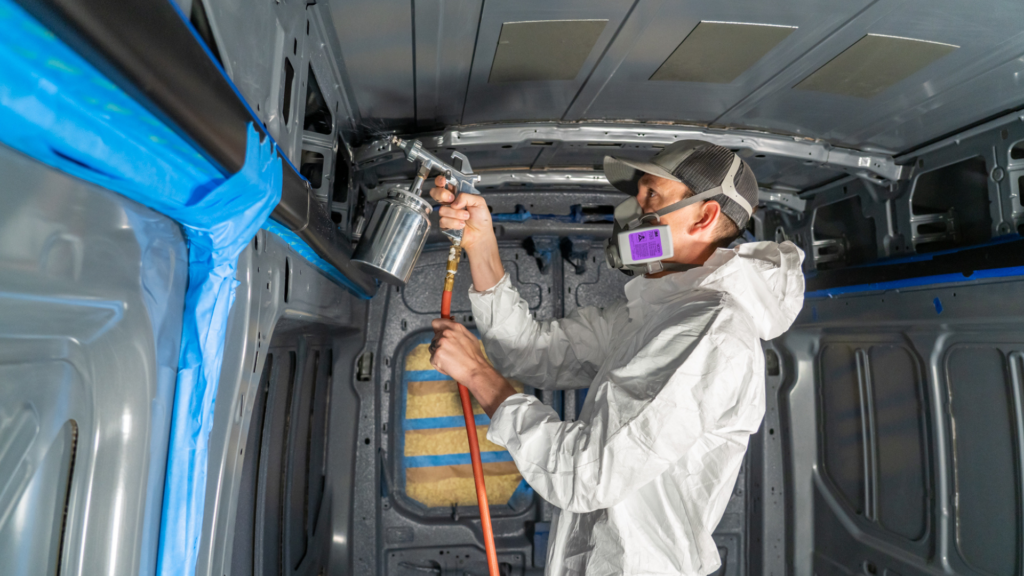
Sound Control: $2,515.62
Sound control is our first step in a camper van conversion. In this van, we chose to use Lizard Skin Sound Control and Ceramic Insulation. The Lizard Skin Sound Control worked great and provided a full coverage throughout the van. The Ceramic Insulation added a layer of protection from heat loss/gain, which was an added benefit.
However, looking at the cost of Lizard Skin and the overall benefit, I probably wouldn’t do this again at all. It was a pain in the butt to apply, it made a mess, and I’m still trying to scrub Lizard Skin off my desk over a year later.
Cheaper Alternatives to Lizard Skin for Sound Control:
- A less expensive option for sound control is Fatmat sound deadening. We used this in our Sprinter van and it worked great as well. Approximate cost: $150.00
- An even cheaper alternative would be to simply not do sound deadening. By the time you have installed insulation, cabinets, walls, a bed, and all the other items in a camper van build, you’ll have quite a bit of sound deadening in the van. And ultimately, your silverware rattling around in the drawer as you drive is going to be more noisy than the van itself. Approximate cost: $0.00
Advertisement:
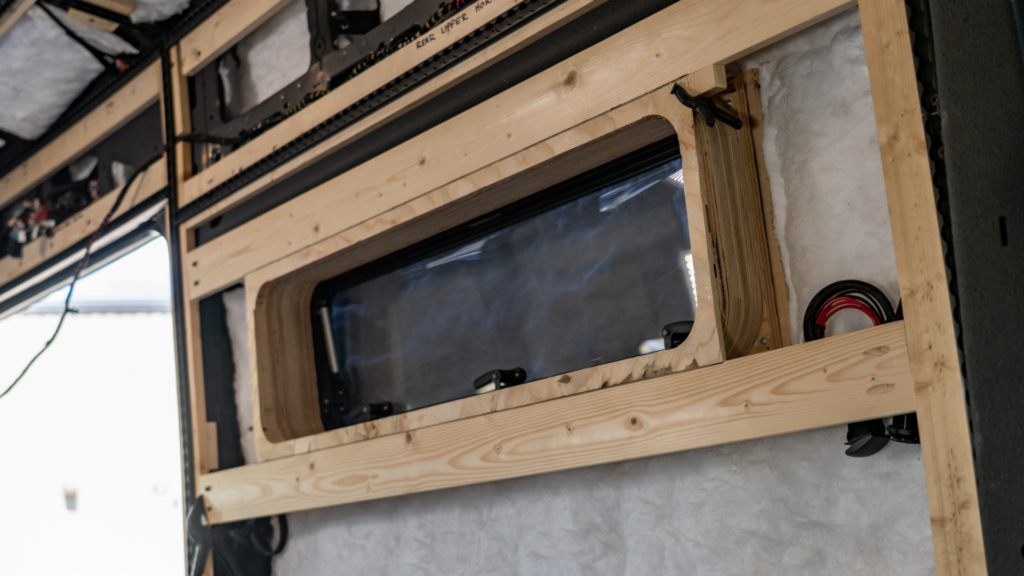
Tern Overland Arctic Tern Windows – $2,305.86
Installing additional windows in the camper van was important to me for some added natural light, which is something we didn’t have in our Sprinter. Since we live in the mountains of Colorado and are often in cold environments in the winter, we chose Tern Overland Arctic Tern Windows as they are double-paned and great for a 4-season camper.
*Use code Exploristlife10 for 10% off your order with Tern Overland*
Cheaper Alternatives to Arctic Tern Windows
- Half-Slider windows are a less expensive option for van windows. You lose the insulation properties of the double-pane as well as the full opening functionality, though. Approximate Cost: $400 per Window
- And again, an even less expensive option would be to not add windows at all. That will save you time and money on your conversion. Approximate Cost: $0.00

Advertisement:
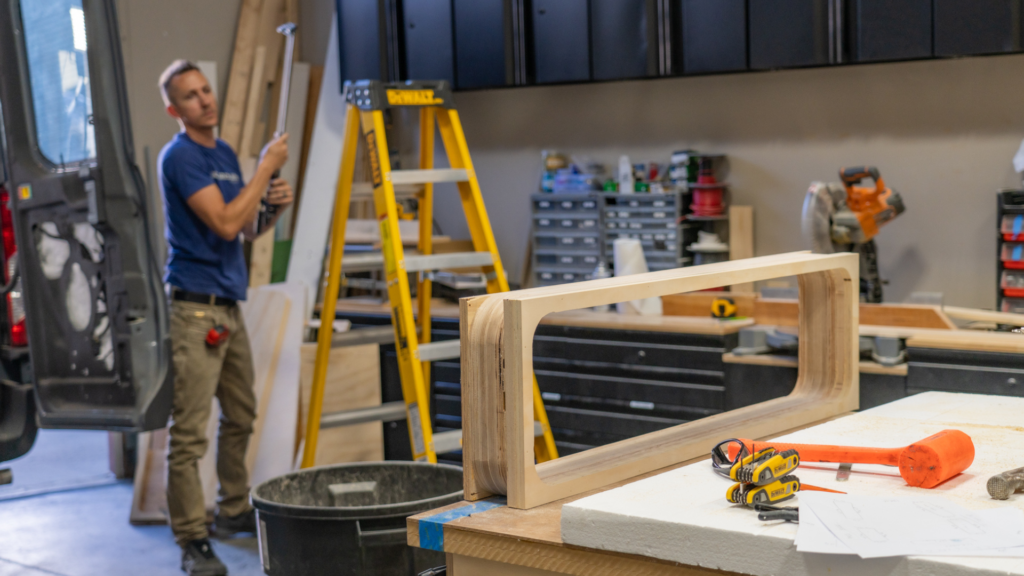
Satsang Vanworks Custom Window Jambs – $1,311.00
Since the Tern Overland windows are designed to be installed directly against the metal and doesn’t account for insulation and walls that typically come in a camper van conversion, we needed a way to space out the window from the walls. Satsang Vanworks has created a perfect, easy solution to this with their custom window jambs. They look great and can be covered in whatever interior material you choose. These made this step much easier.
*Use code Explorist.life for 5% off your order*
Cheaper Alternatives to Satsang Vanworks Window Jambs
- If you are using a window like the Arctic Tern windows that require a window jamb, you could indeed make one yourself out of plywood and use your window as the template to cut it out. Approximate Cost: $200.00
- If you are using a window that does not need a jamb or you opted for no windows, there would be no cost. Approximate Cost: $0.00
Advertisement:
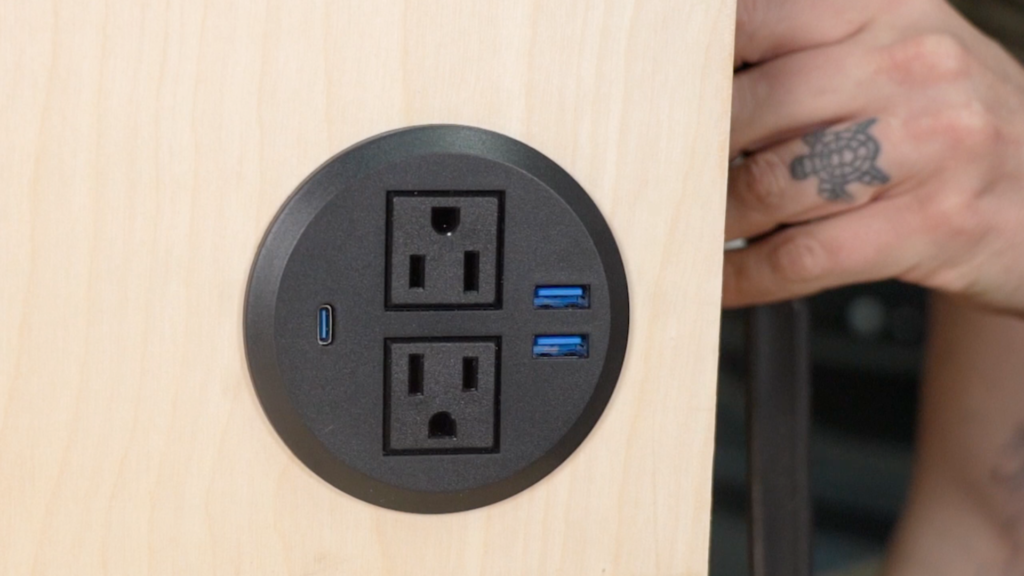
Branch Circuit Wiring – $269.95
For our branch circuit wiring, we used our own EXPLORIST.life branch circuit wiring kits to wire our USB outlets, 12V outlets, and 120V outlets. In this van, we used three kits of 20′ USB/12V Outlet wiring kits, six 12V Outlets, and six USB Outlets.
Cheaper Alternatives to Branch Circuit Wiring
This one is pretty hard to give a cheaper alternative, as we’ve made our kits specifically so you are not wasting money on buying huge packs of lever nuts or extra wire.
- Use less wiring kits and less outlets. If we used just one kit of USB/12V Outlets and one puck light wiring kit with three 12V Outlets, we would have saved quite a bit. Approximate Cost: $63.89

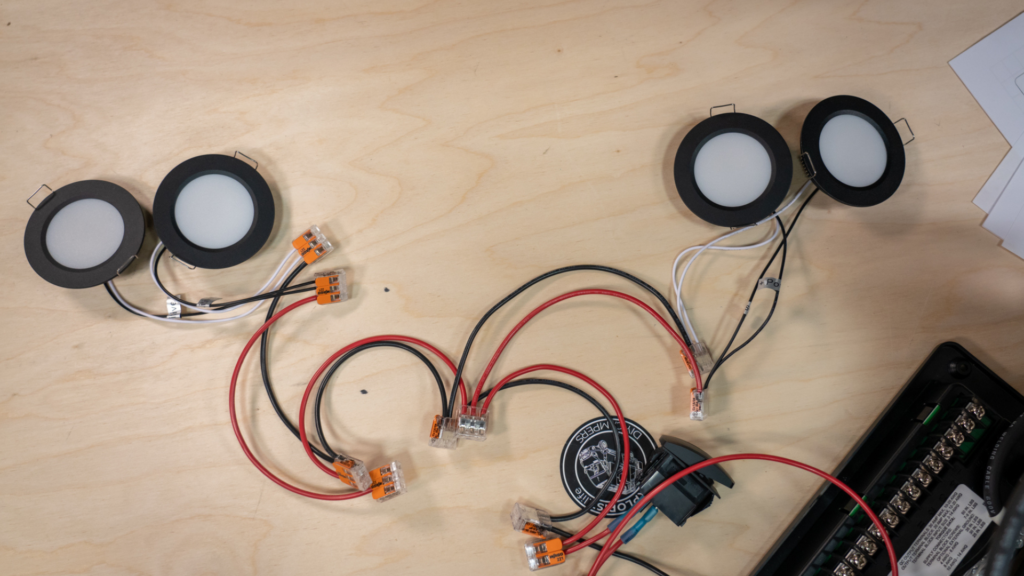
Lighting – $108.99
We used puck lights on the ceiling and LED strip lighting under the cabinets for some indirect lighting.
Outlets/Switches $369.97
We put various outlets around the van (both 12V and 120V) for easy access. We also added some sleek switches to our control panel for all of the lights. Lastly, we added a dimmer switch for the overhead lighting.
Cheaper Alternatives for Outlets and Switches
- Amazon carries several inexpensive switch options for both toggle switches and dimmers, and you could, again, simply put fewer outlets and switches for a less expensive option. Additionally, buying outlets in white is much cheaper than the black ones we purchased. Approximate Cost: $75
Advertisement:
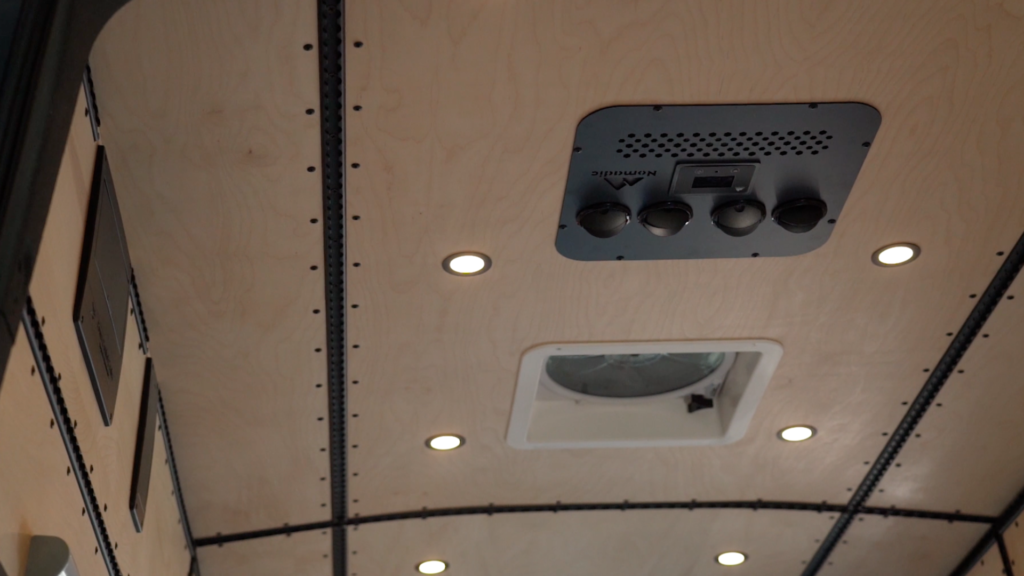
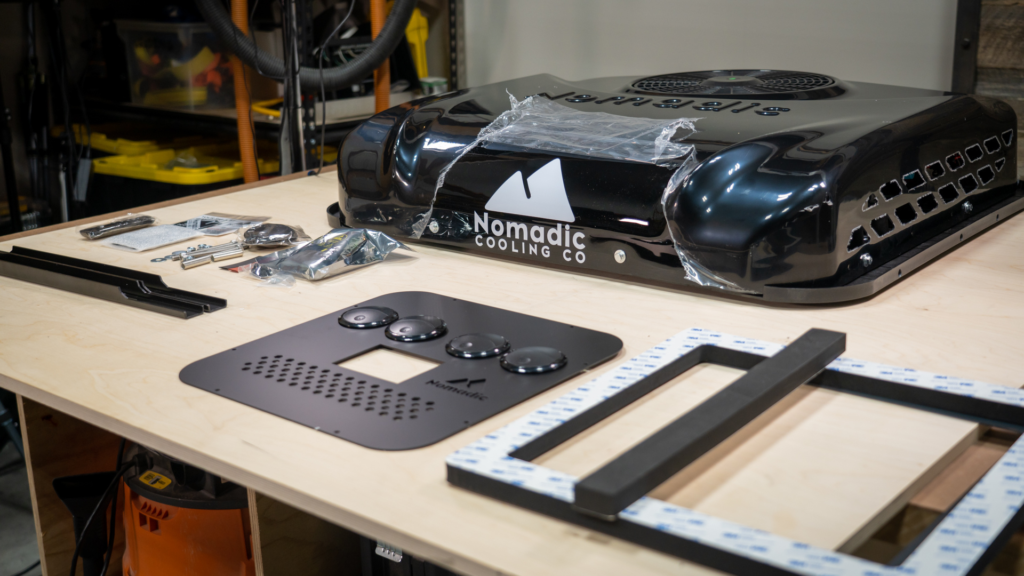
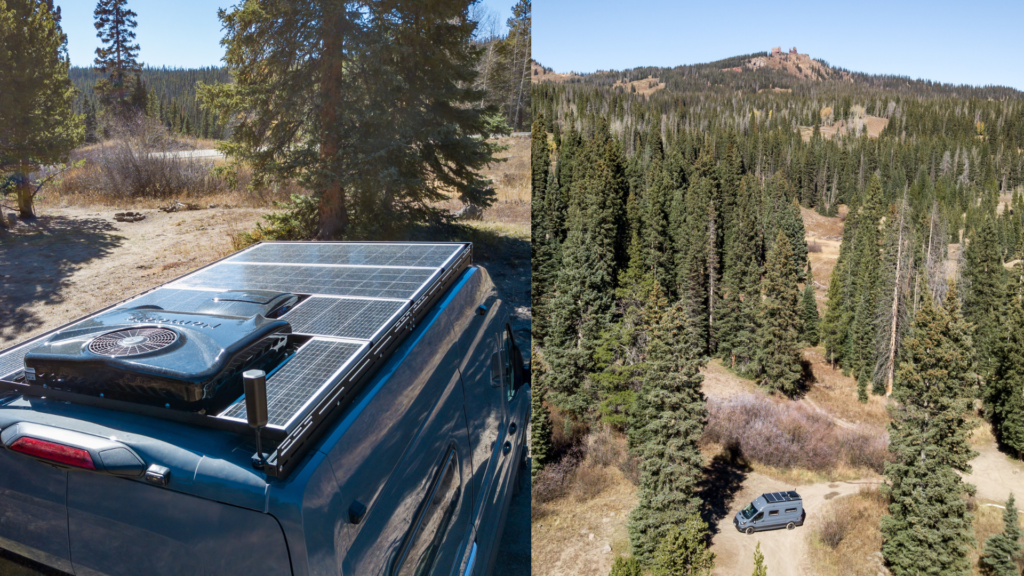
Nomadic 24V Air Conditioner – $4,989.00
To make sure we are comfortable in all weather conditions, we added a Nomadic 24V Air Conditioner for those hotter days. This is a luxury we did not have in our previous Sprinter van, and we’re excited to have the ability to stay cool when we go on those rare warm weather trips. Our team has also appreciated the Air Conditioner at summer expos and trade shows!
Cheaper Alternatives to a Camper Van Air Conditioner
- Earlier model of the Nomadic 24V Air Conditioner. Approximate Cost: $3,199.97
- Omitting an Air Conditioner altogether. Approximate Cost: $0.00
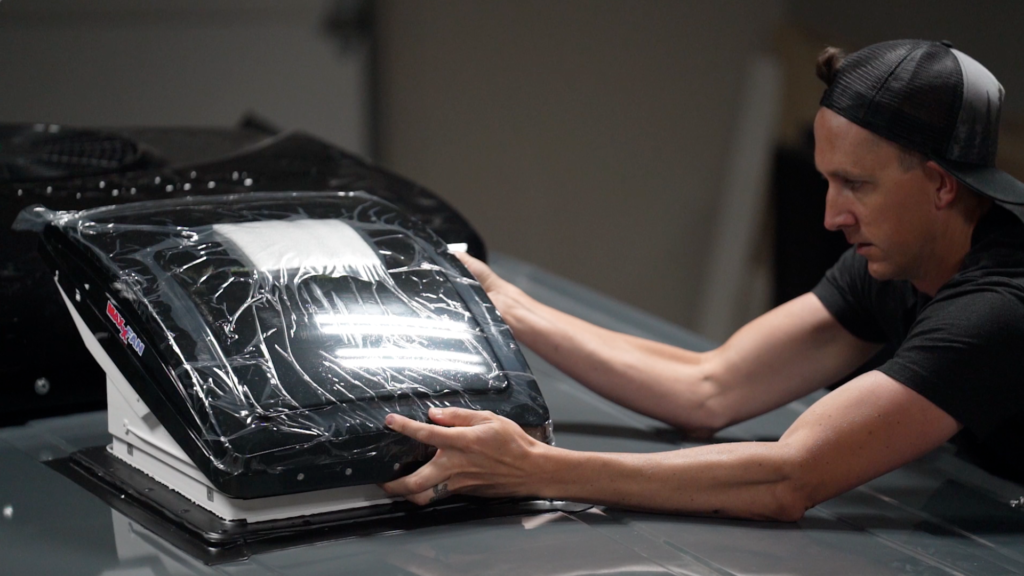
Maxxair Fan – $543.29
When it’s not quite hot enough to need the Air Conditioner, but we still want some air flow, a Maxxair Fan is the way to go. We opted for both the Air Conditioner and the Maxxair Fan so we could have the option of running just the fan when we didn’t need full AC, but so far we haven’t actually used the Maxxair fan much. The Nomadic AC does have a fan mode as well, so in hindsight, perhaps this was redundant.
Cheaper Alternatives to a MaxxAir Fan
- Amazon has a wide variety of RV Roof Fans that are much less expensive than a MaxxAir fan. I cannot speak towards the quality of them, though. Approximate Cost: $60.00-150.00
- I wouldn’t recommend omitting a roof fan entirely, unless you have opted for the Air Conditioner. Having some way to move air around a camper van is pretty important.
Advertisement:
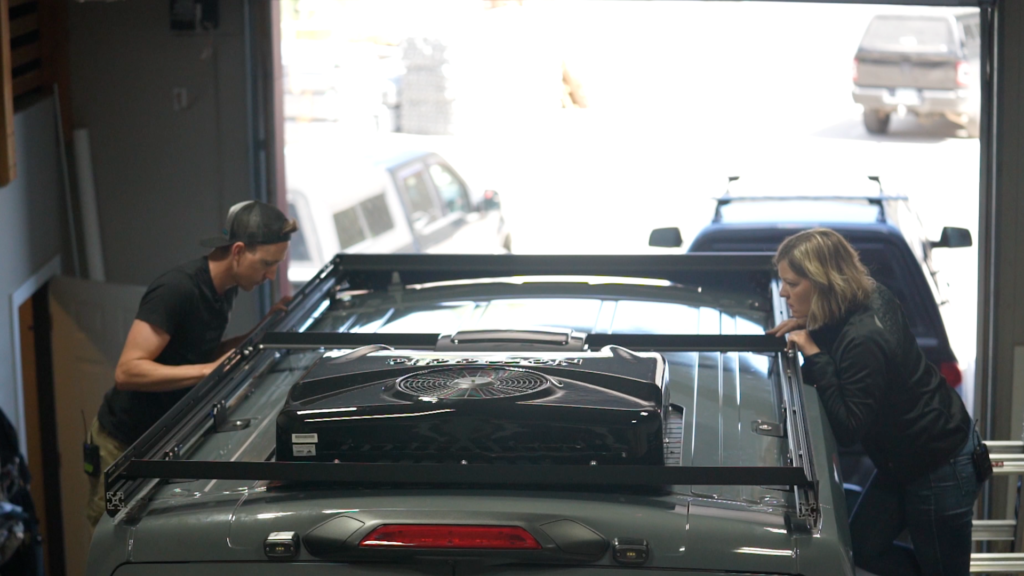
Unaka Roof Rack – $1,695.00
We worked directly with Unaka Gear Co to design this low profile roof rack that has cross-bars exactly where we need them for mounting 55W Rich Solar Panels around the Maxxair Fan and 35W Rich Solar Panels around the Nomadic Air Conditioner. This allowed us to optimize our solar on the roof while still having a sleek looking roof rack.
Cheaper Alternatives for Camper Van Roof Racks
I could probably write a full blog post on the different types of roof racks for campers, so we’ll keep it brief here.
- Unaka Gear Co has a variety of roof racks from $595 up to $1,950
- Many people also make a DIY Roof Rack out of 8020 Extrusion. Approximate Cost: $400.00
Weboost – $550.33
If you work from the road like we do, you know that having cell signal is imperative. While a WeBoost won’t guarantee cell signal everywhere, it does indeed help a ton to boost a weak signal in more remote areas.
Cheaper Alternatives for Cell Signal Boosters
- Simply not adding one. Approximate Cost: $0.00
- This one from Amazon actually has pretty decent reviews. Approximate Cost: $199.89
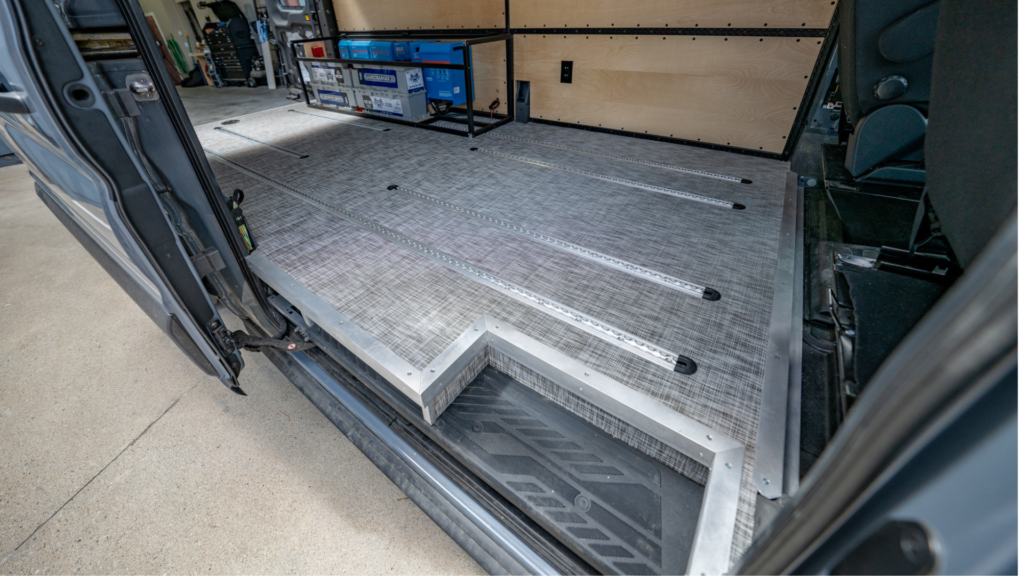
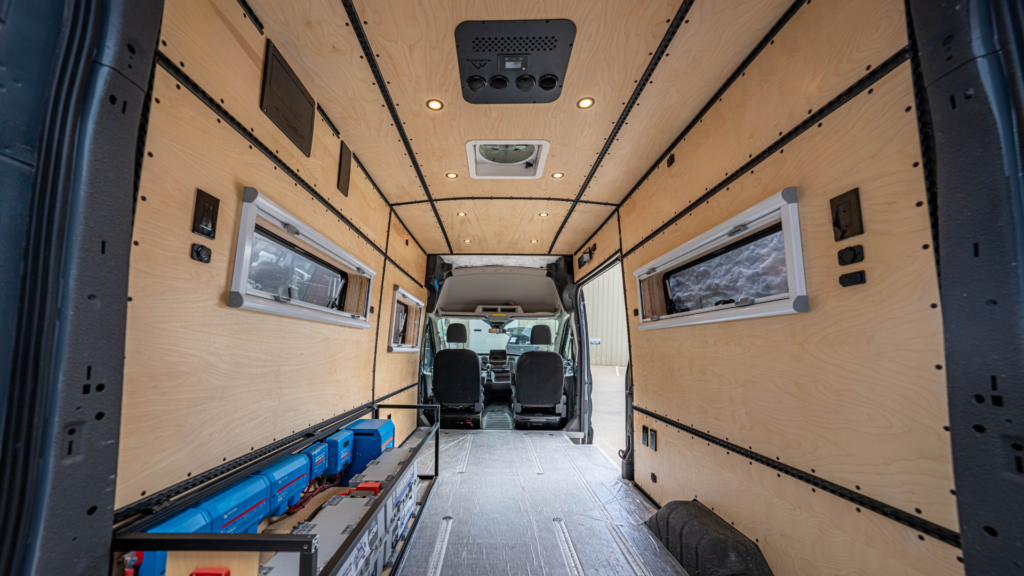
Flooring – $2,450.40
We tested several different flooring types through our very scientific method of scratching it with a screwdriver and then pouring Mule Sauce hot sauce on them to see which one cleaned up the easiest and best. The Chilewich tweed flooring stood up the best to both tests and it looks great, so that’s what we went with.
As our subfloor, we used R Sheathing, which allowed us some added structure as well as insulation on the floor. We also installed L-Track in 4 locations along the floor to mount our lower cabinets, bikes, and anything else we may want to secure.
Cheaper Alternatives for Van Flooring
- Opting out of L-Track will save you big money here, and opting for a less expensive floor covering would also save money. In our Sprinter, we used bamboo click and lock flooring from Home Depot. While it was cheaper, it also did not stand up to the abuse we put it through. YMMV. Approximate Cost: $300.00
Advertisement:
Insulation – $820.00
In addition to the Lizard Skin ceramic coating, we insulated the entire van with Thinsulate insulation. Insulation is important for temperature control, and to get the full effect, you want to get full coverage throughout the camper. So, we stuffed Thinsulate into every nook and cranny we could. It was time consuming, but after camping in hot weather and cold weather in this campervan, we can attest that it was indeed worth the extra effort.
Cheaper Alternatives for Camper Van Insulation
- In our first van, we used rigid foam insulation for the large areas, along with expanding foam for the smaller areas. It worked well for our purposes, but there were definitely cold spots in the van. Approximate Cost: $500.00
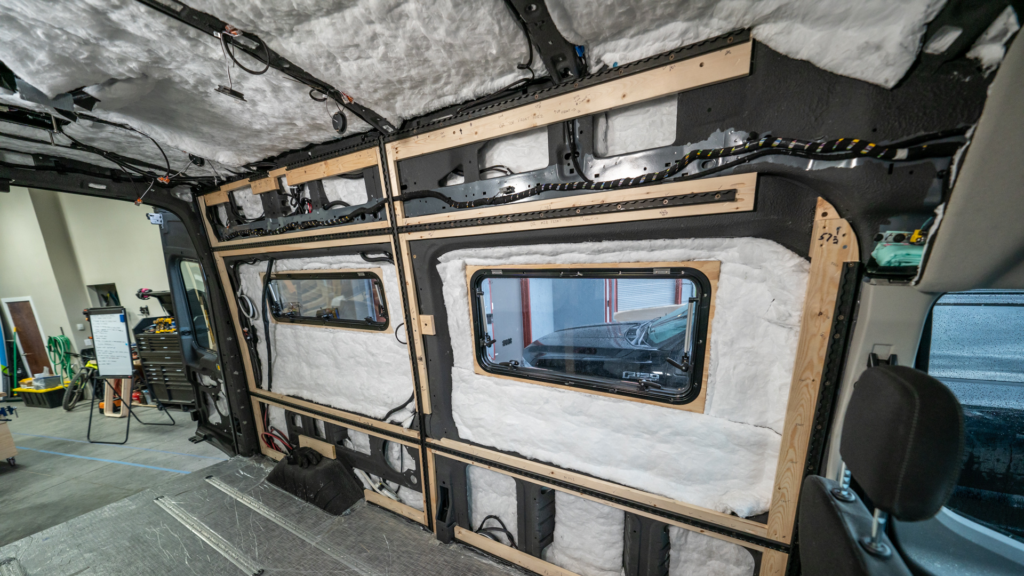
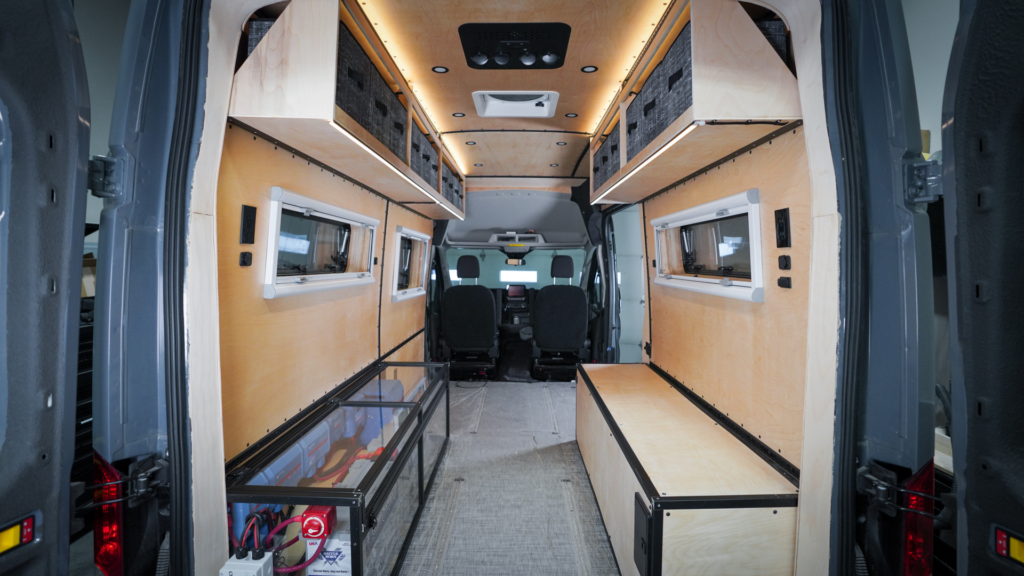
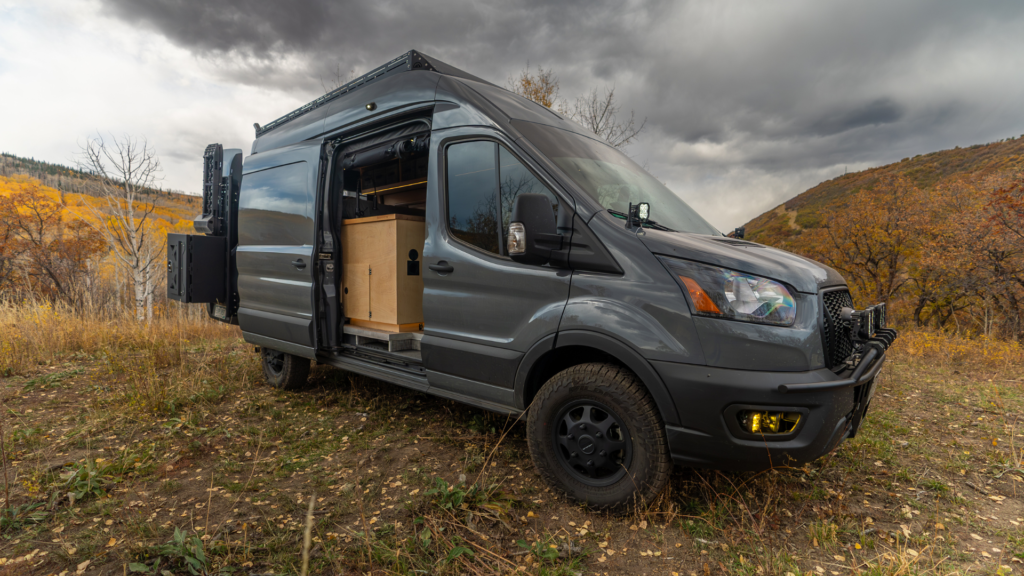
Walls – $4,484.58
We did a full video covering the cost of our walls versus a pre-made kit like Adventure Wagon’s wall kit. Our walls are birch plywood with black L-Track framing, secured to the walls of the van with plusnuts.
While these did cost quite a bit, we ended up with beautiful walls with tons of L-Track to secure all sorts of things, and it was significantly less expensive than a pre-made wall kit.
Cheaper Alternatives for Camper Van Walls
- Opting out of L-Track (especially the black L-Track) would save a bunch of money here. However, you would need to find an alternative to mount cabinets. Approximate Cost: $2,500
- Opt for a less expensive wall material than the birch that we used. Approximate Cost: $1,500
Advertisement:
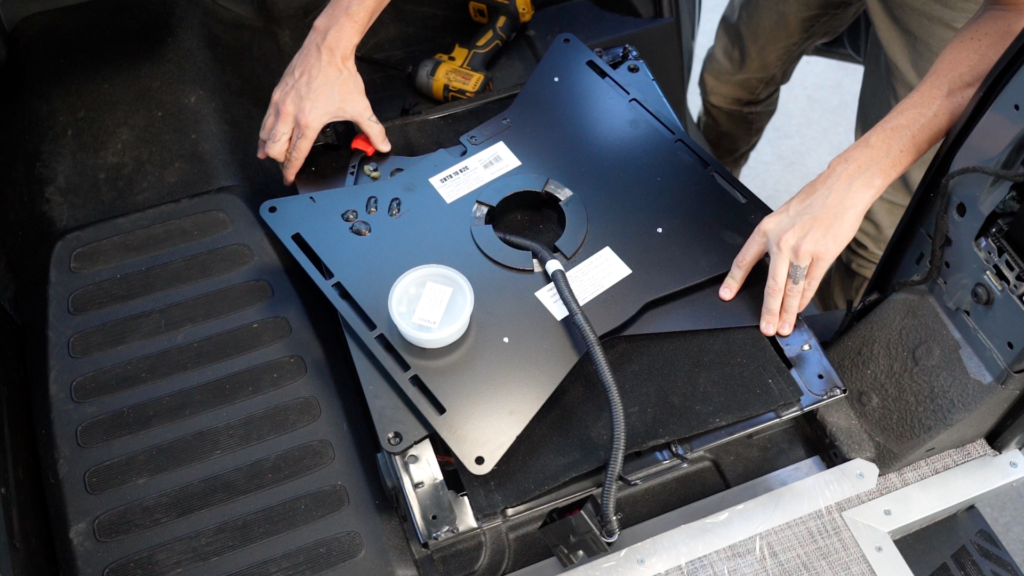
Swivel Seats – $699.98
Swivel seats allow for us to use the driver and passenger seats of the Transit in the living space of the camper van. This means less space needed for additional seats.
*Use code EXPLORISTLIFE for 5% off at theswivelshop.com*
Cheaper Alternatives for Swivel Seats
- Opt Out of Swivel Seats. Approximate Cost: $0.00
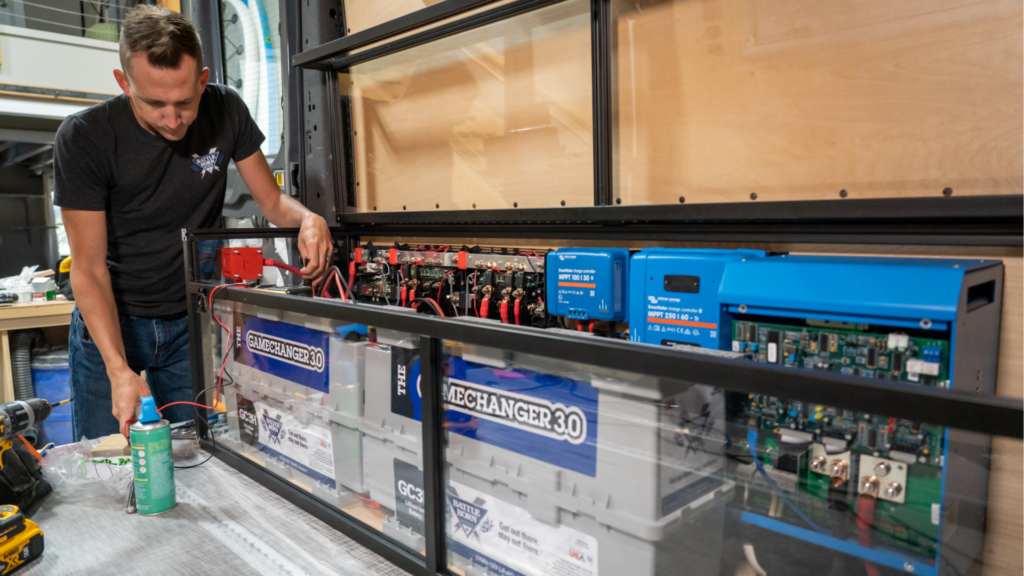
Electrical System – $12,060.0
The electrical system is definitely not a place where we were going to cut corners. Our electrical system is a high-powered system with 540Ah of Battle Born Lithium Batteries, 3000kVa of inverting power, 30A Shore power connection, dual Victron Orion 12|24-15A Alternator chargers, 580W of solar on the roof, and the ability to add a ground deploy solar array of up to 1700W. We went with a 24V system for this installation so that we could use smaller wire for the component connections.
You can see our exact electrical system in our shop HERE.
Cheaper Alternatives to Camper Van Electrical Systems
We’ve covered this topic a ton here at Explorist.life, so we’ll try to keep it simple.
- The EXPLORE LIGHT 200Ah Camper Van Wiring Kit. Approximate Cost: $6,399.99
- The EXPLORE 400Ah Camper Van Wiring Kit. Approximate Cost: $9,999.99
Advertisement:
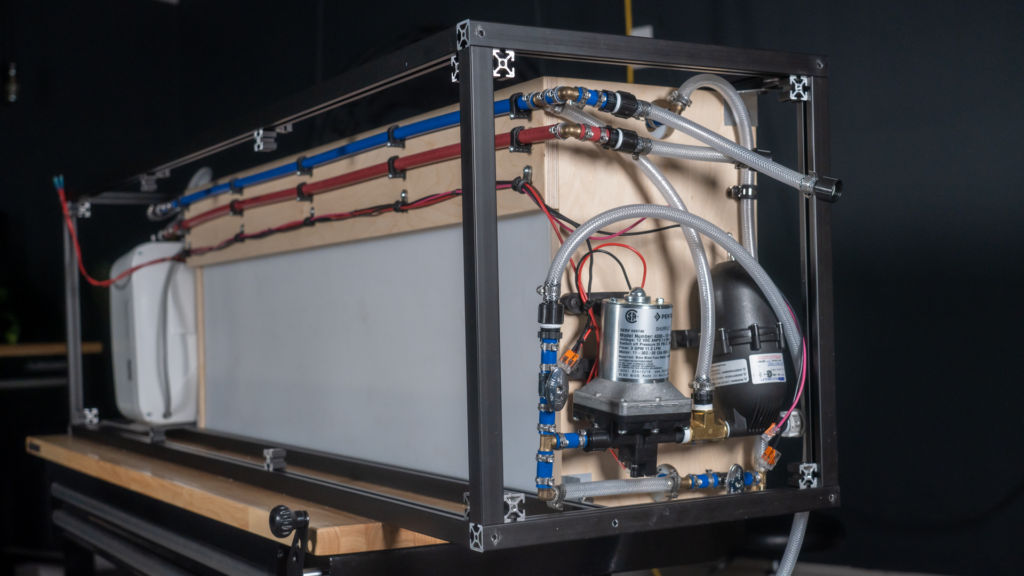
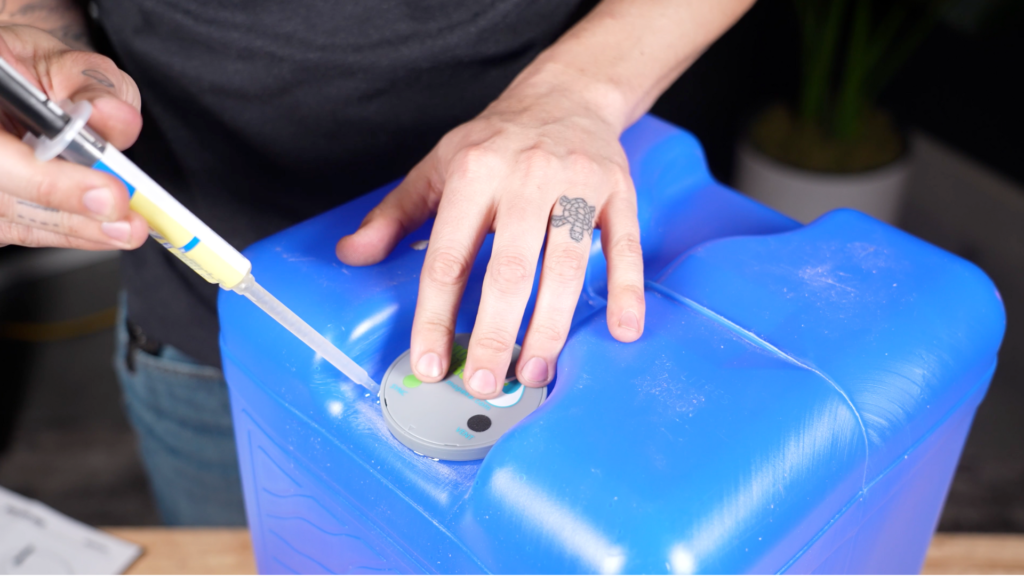
Plumbing – $1,911.48
We installed a 20 gallon wheel well water tank from Titan Vans, as well as a water heater and a water pump to deliver water to the sink and outdoor shower.
Cheaper Alternatives to Camper Van Plumbing
- In our Sprinter van, we had a much less sophisticated plumbing setup, which included:
- Water Pump Approximate Cost: $75.00
- Two Portable Water Containers for fresh water Approximate Cost $40.00
- An Aquatainer for grey water Aprroximate Cost: $16.00
- Various Plumbing parts to connect everything. Approximate cost: $40.00
- Approximate Total Cost: $171.00
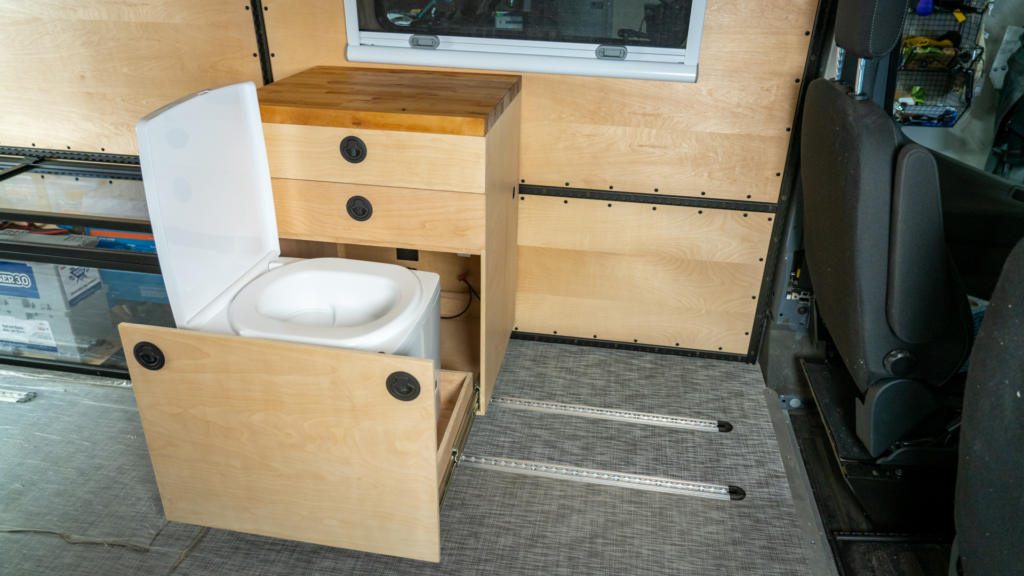
Composting Toilet – $780.00
Contrary to popular belief, composting toilets do not smell bad. We once again installed a composting toilet in this campervan, just as we did in our Sprinter van. The composting toilet is a great alternative to cassette toilets, as you don’t have to be carrying around sewage in your van.
I’m going to skip alternatives to toilets, because… you do you there. There are too many options here.
Advertisement:
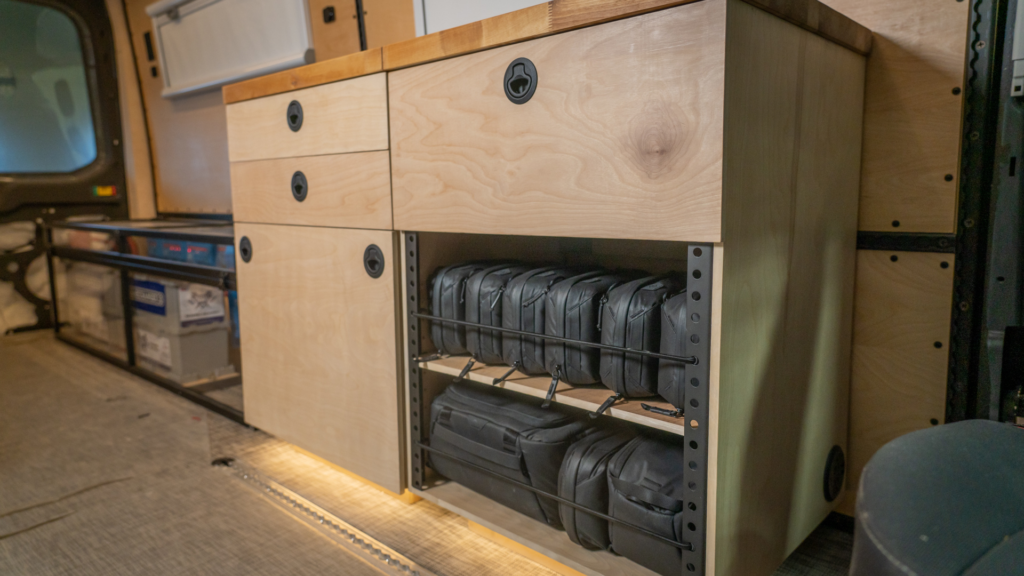
Cabinets – $2,518.49
We have essentially 4 “modules” of cabinets in this campervan, all mounted to the walls and floors with L-track mounts. The upper cabinets are all open faced, and we use storage bins to store our things. This makes it super easy to load and unload the camper, as we can just pull the bins out and take them inside the house.
The kitchen module has a drawer for our utensils, a drawer for our trash bin, a drawer for our dishes, and then a cabinet that is accessible from the outside of the van for easy access to the gray water tank.
Our storage module is designed to carry all our camera gear and Peak Design packing cubes for miscellaneous items. This is a great way to organize all of our gear for different videography and photography trips.
Our toilet module is just that – a cabinet to store the toilet. The toilet pulls out for use and then stores nicely away. There are two storage drawers above the toilet for toiletries.
Cheaper Alternatives to Cabinets
There are so many different ways to do cabinets and save money here, it’s just not feasible for me to break down every way you could save money. A few potential ways, though:
- Use less expensive wood (we used birch)
- Make fewer cabinets
- Use fewer drawers (drawer slides are expensive)
Advertisement:
Kitchen – $2,691.41
In addition to the storage in the kitchen cabinet, this module has an induction cooktop, a sink, a fridge, a gray water tank, and a wireless tank sensor to monitor tank levels.
Cheaper Alternatives to Camper Van Kitchens
- Omit the induction cooktop for a savings of about $200.00.
- Opt for a less expensive fridge, Approximate Cost: $250.00
- In our Sprinter, we used a Chest-Style Fridge, an alcohol burning stove (which apparently is no longer sold, so I’ve linked to a similar product), and a small sink. Approximate cost $1,500.00

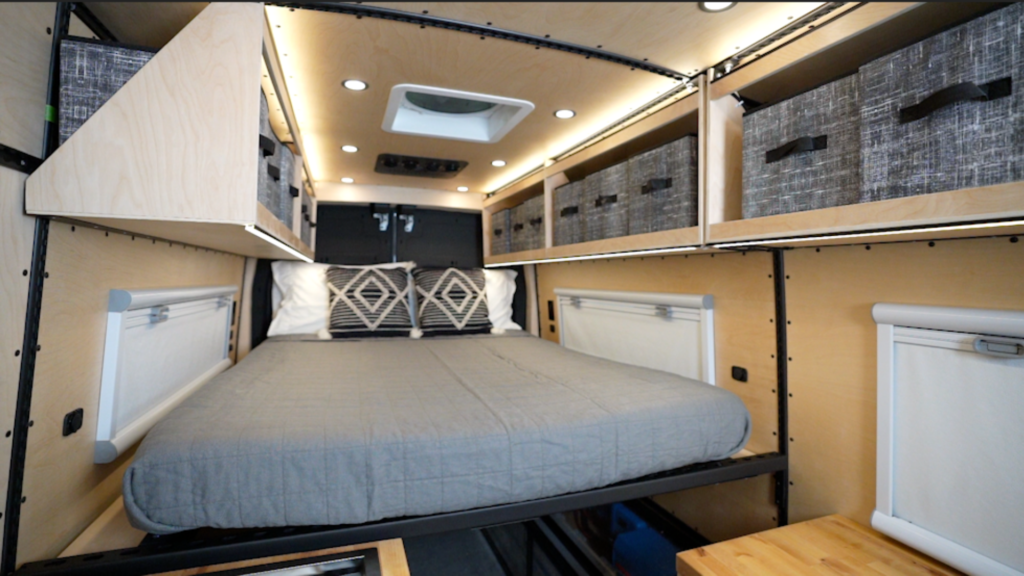
Bed Platform – $1,705.71
We opted for a pretty simple bed platform in this build, using unistrut for the framing and square tubing for the headboard frame. Since our bed is slightly narrower than the width of the van, we added a slim hidden table on either side of the bed where we can put our phones, coffee cups, etc while we’re in bed.
Our mattress came from Tochta, who specializes in specialty customizable mattresses. While our mattress ended up being a typical full-size mattress, we still wanted the flexibility that came with the Tochta mattresses. In our Sprinter van, we simply ordered a mattress off of Amazon, and, while it was comfortable enough to sleep on, it was a pain in the butt to maneuver for cleaning and making the bed.
Cheaper Alternatives for Camper Van Beds
- Omit the headboard to save on the square tubing and wood. We also had leftover unistrut that we couldn’t return, so I’ve omitted that from the cost. Approximate Cost $1,000
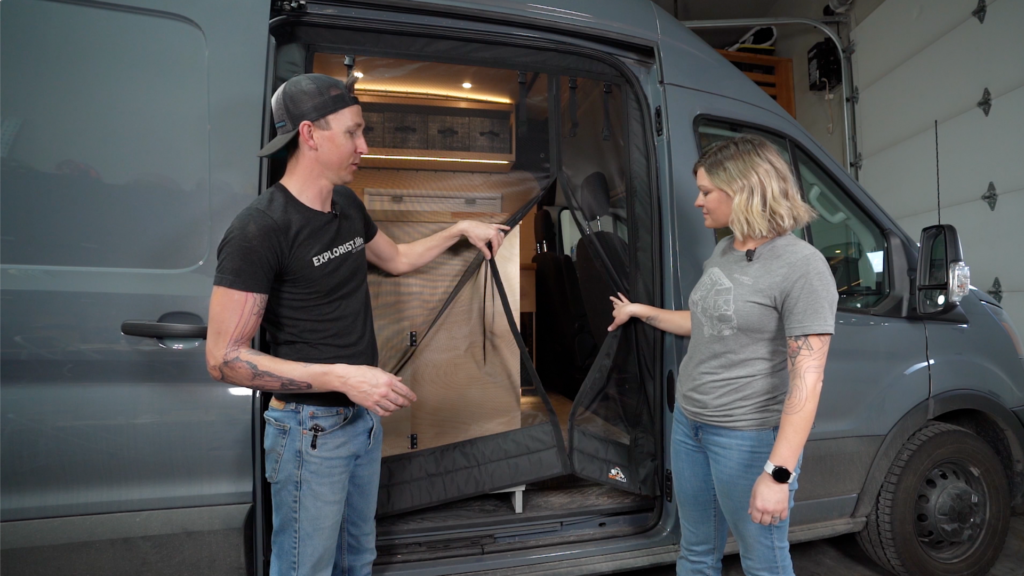
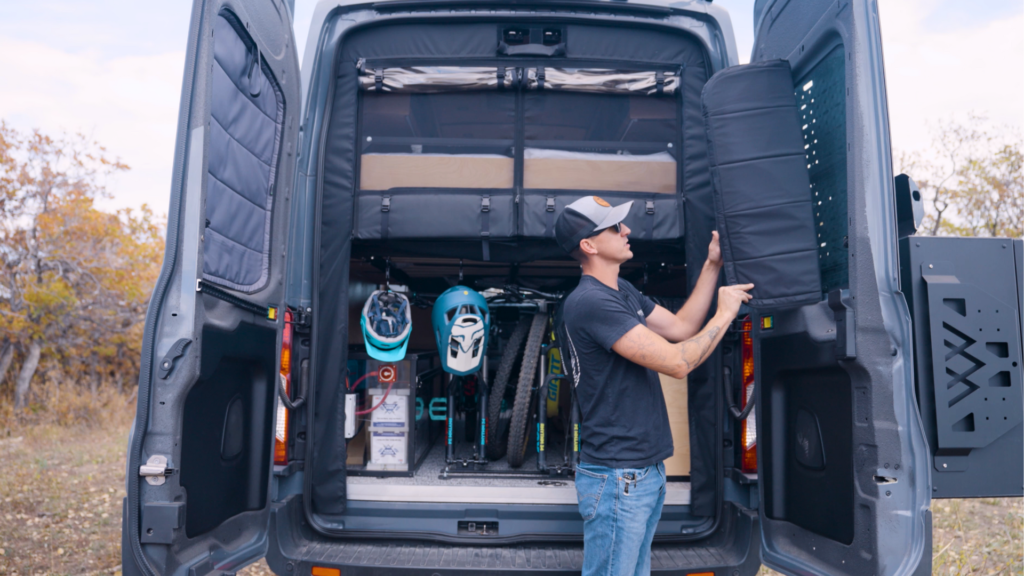
Bug Screens – $948.00
We installed Bug Wall Bug Screens both on the back doors and the side door of the Transit to keep insects out while allowing fresh air in. The back Bug Wall also has a window option and insulated “garage” covers so we can keep the doors open in inclement weather, if we wanted to do that.
Cheaper Alternatives for Bug Screens
- If you’re good at sewing, make your own bug screens from netting. I hate even recommending this because of the pain and suffering we cause Nate’s mom in our Sprinter to make them for us! Approximate Cost: $100 and a lot of cussing.
- Simply omit bug screens and deal with the bugs another way. Approximate Cost: $0.00
Advertisement:
Tank Sensors – $138.13
This is something I SO MUCH wish we had in our first camper van. Tank sensors help monitor water levels in your campervan to let you know if your gray water is almost full, if your fresh water is almost empty, and even the temperature in the van. We have alerts set up for each of these so we know exactly when we need to make plans to stop and empty/fill tanks or to make sure the water tanks don’t freeze.
Cheaper Alternatives for Tank Sensors
This is an easy one! Just omit the tank sensors and check the tanks manually. We did that in our Sprinter for 4+ years. Approximate Cost: $0.00
Lift Kit – $3,975.48
Living in the mountains in northeastern Colorado, ground clearance is a major concern. We added a Van Compass Stage 4 Topo 2.0 System, which includes adjustable rear Falcon 3.3 SP2 shocks, with 2.0″ of lift for improved ground clearance. The Topo Front Lift kit combines a precision engineered 0.75″ lift camber correction plate with a tuned coil spring, while the rear lift is accomplished by a 5 leaf mini spring pack.
Cheaper Alternatives to a Ford Transit Lift Kit
Suspension is not a place to cheap out, so, if you’re looking to save money, simply opt out of the lift kit. Approximate Cost: $0.00
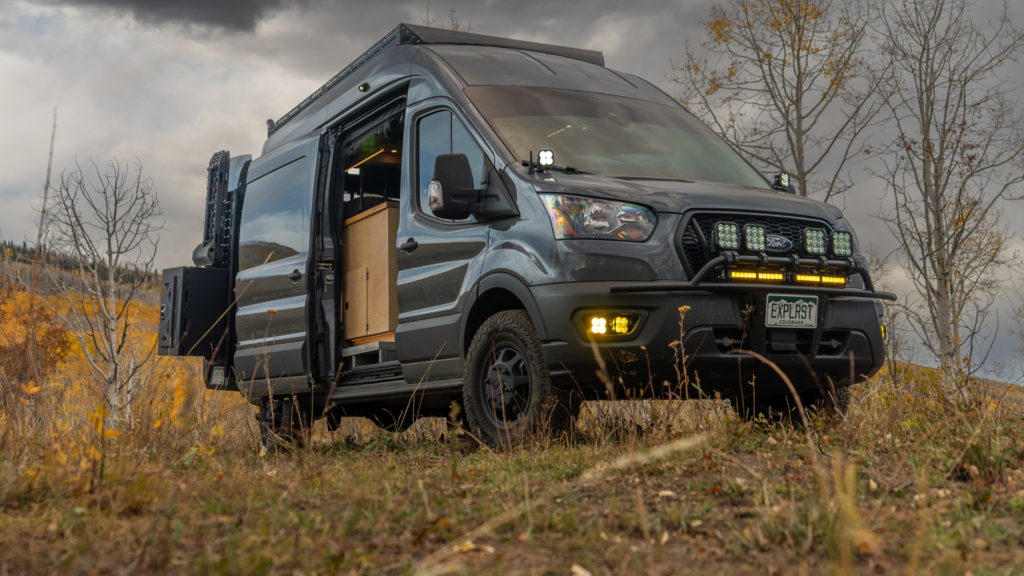
Wheels/Tires – $2,419.86
With the lift installed, we also needed to upgrade those dinky stock wheels and tires to add some additional ground clearance and all-terrain performance. The tires we added are Falken Wildpeak A/Ts in size 245/75/16 on Method Wheels.
Cheaper Alternatives to Method Wheels and Falken Wildpeak Tires
Since this is such a personal item, I’m just going to leave a few links here:
- Van Parts Warehouse has several options for Ford Transit Wheels
- Keep the stock tires on if you’re doing mostly highway driving
Advertisement:
Nudge Bar – $895.00
We installed the Flatline Van Co nudge bar so that we could attach all of our auxiliary lights, as well as provide some additional protection to the front of the van.
Cheaper Alternatives to a Nudge Bar
A nudge bar is a pretty inexpensive addition in comparison to the other bumpers on the market, so the only real option here to save some money is to not add anything to the front of the van.
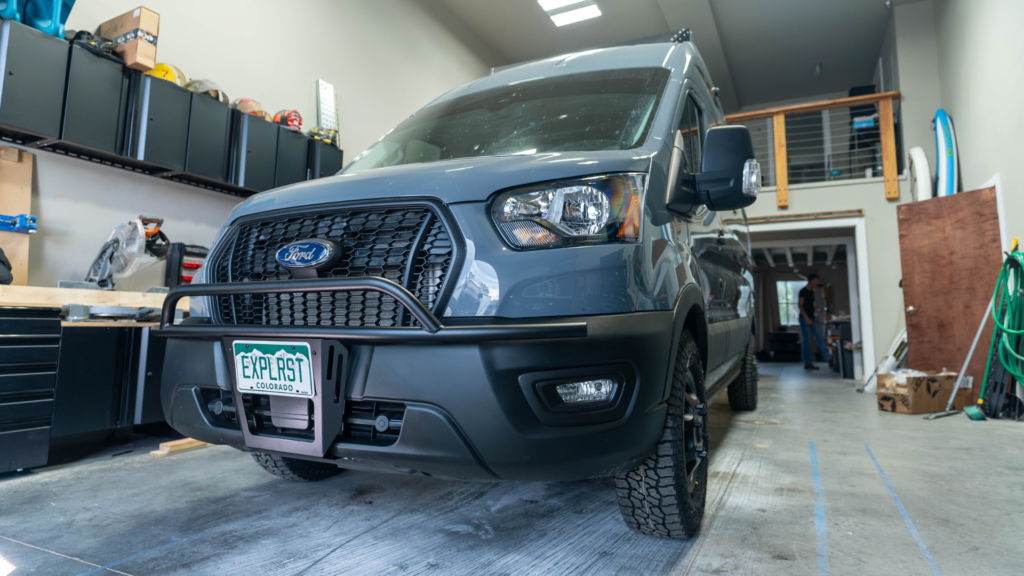
Exterior Lighting – $2,458.40
While it may seem overkill, we added a TON of lights to the exterior of our van. Living in the mountains of Colorado, we need to be able to see well in snow, rain, and fog, and be able to light up ditches and back roads as deer, elk, bears, and other wildlife are often lurking on the road at night. With the lighting options we have installed, we have several options for lighting up the road for nighttime driving. We installed:
- Diode Dynamics SS3 Pro Yellow Bumper Fogs (pair), which replaced the factory fog lights using the FreedomVanGo Fog Light Upgrade brackets
- Diode Dynamics Stage Series 12” Amber Bars (pair), mounted to the bottom of the nudge bar.
- Diode Dynamics SS3 Pro White Ditch Lights (pair), mounted on VanCompass hoodline light pod mounts
- Diode Dynamics SS5 White Sport Driving Lights (4), mounted on top of the nudge bar
Cheaper Alternatives to Exterior Lighting
Omitting any additional exterior lighting is indeed a cheaper option here. In addition, Van Parts Warehouse carries a ton of different types of lights that you can pick and choose which suits your needs best.
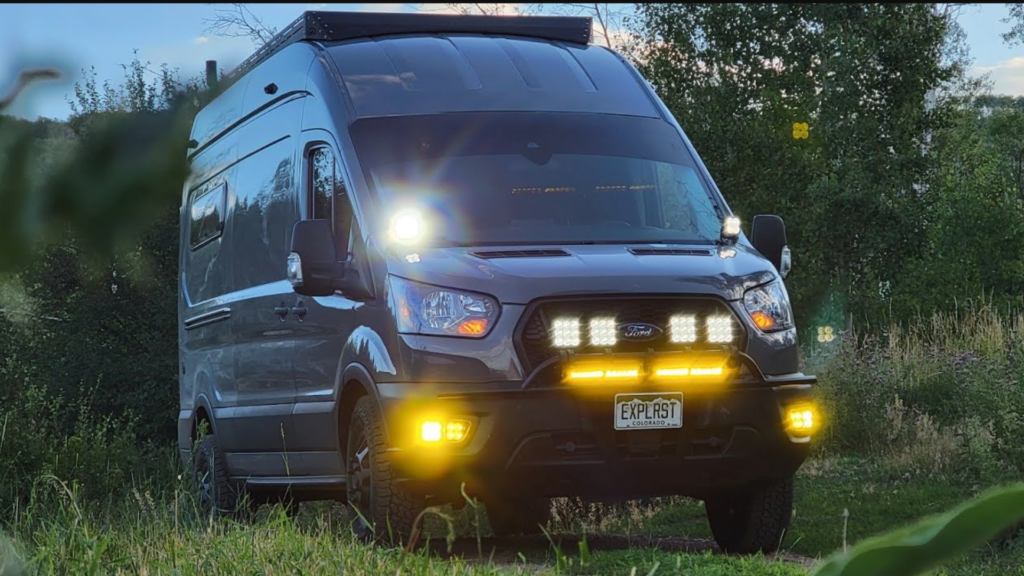
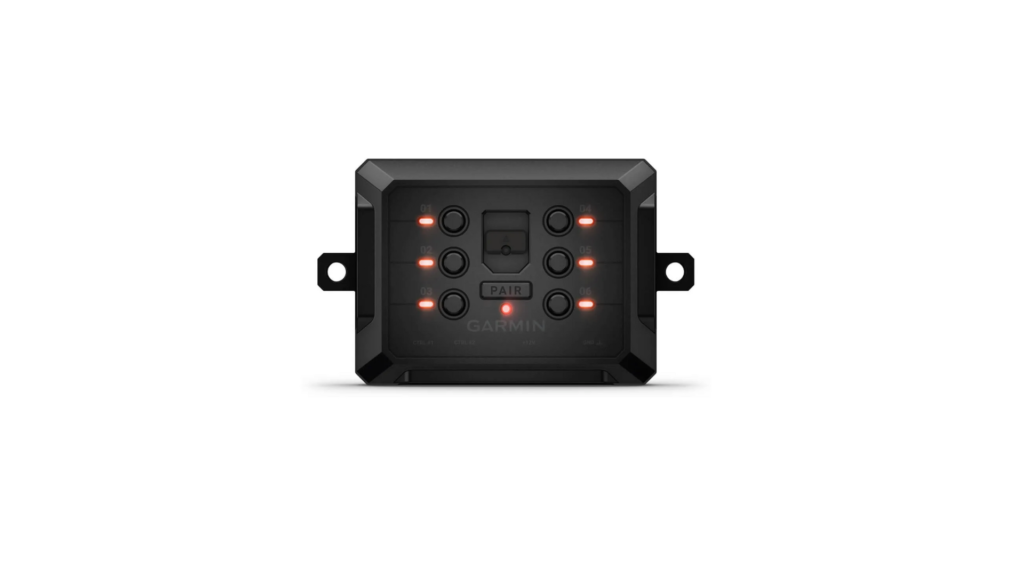
Garmin PowerSwitch – $415.59
To control all of that lighting without having to toggle a bunch of switches all the time, we installed the Garmin PowerSwitch. This allows us to control the lights via the factory touchscreen in the Ford Transit, as well as through our phones via bluetooth. The Garmin PowerSwitch also enabled us to wire the ditch lights to our high beams so that we can turn them off and on easily while driving, so as not to blind other drivers. This also allows the Ford high beam sensor to turn off our ditch lights when it senses other cars approaching.
Cheaper Alternatives to the Garmin PowerSwitch
- If you’re not adding lights, this can be omitted easily. Approximate Cost: $0.00
- Rather than the fancy controller, simply wire in relays for the lights controlled by switches. Approximate Cost: $100.00
- Amazon has some less expensive switch panels
Advertisement:
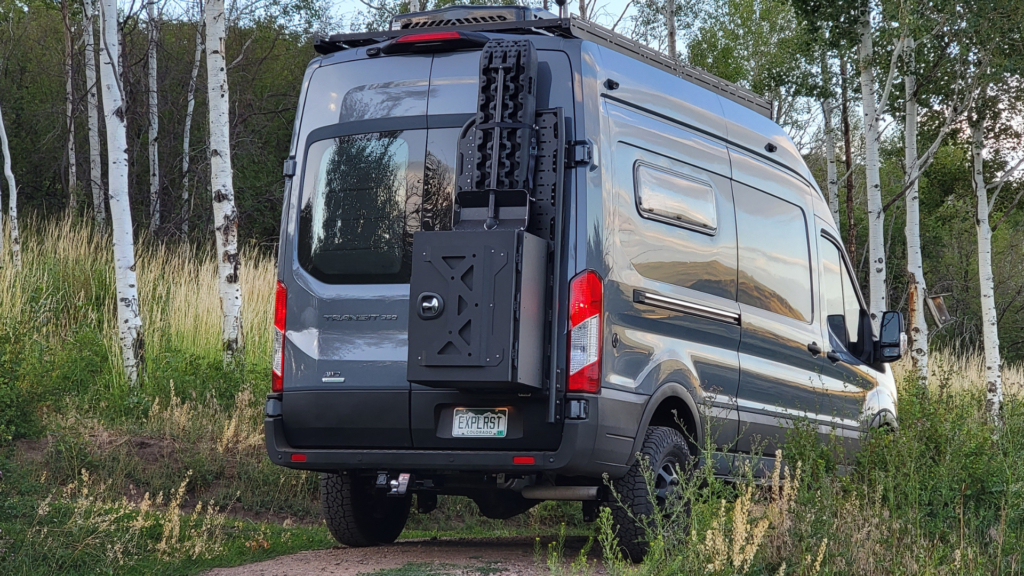
Exterior Storage – $2,569.65
Storage solutions outside the van are essential for gear and equipment like shore power cords, tools, water hoses, etc. To accomplish this, we installed a Ford Transit Rear Door Platform from Flatline Van Co as well as an aluminum cargo and storage box from Backwoods Adventure Mods.
Cheaper Alternatives to Exterior Storage
- Opt for a roof box rather than a rear mounted box. Approximate Cost: $500.00
- Opt for a smaller rear mounted box. Approximate cost $2,200.00
- Opt out of an exterior storage box. Approximate Cost: $0.00
VanEssential Window Covers – $498.57
After *attempting* to make our own window covers in our Sprinter campervan, we quickly realized the value of purchasing good window covers. The VanEssential window covers are insulated and accordion fold up into a nice compact bag for storage.
Cheaper Alternatives to Window Covers
- DIY your window covers using Reflectix and fabric. Approximate Cost: $100.00
Cost of the van – $65,759.98
This is the cost of the 2021 Ford Transit before conversion, with taxes, fees, registration, etc. included.
Total Cost Overall – $124,859.72
While the cost of converting a 2021 Ford Transit into a fully equipped campervan may seem substantial, the freedom and adventure it offers are priceless to many. And comparing this cost to a build from a professional upfitter such as Storyteller Overland or Outside Van, you’re saving a substantial amount of money by DIYing your campervan.
Hopefully this breakdown of our expenses gives you a clear picture of what to expect when starting your own DIY campervan project. Remember that costs can vary depending on your choices and preferences, so careful planning and budgeting are key to a successful and enjoyable campervan conversion.
