
Ventilation in a Van/RV Electrical enclosure is important for the performance of the system. As chargers and other components work; they naturally put off heat and that heat must be able to escape the enclosure else overheating errors will occur. This blog post is going to teach you how to use a 12V Thermostat to control computer fans that will turn on and off at certain temperature set points.

12V Thermostat Controlled Fan – Parts Required:
Notes about parts required:
- This tutorial assumes you are using a 12V battery bank. If you were using a 24V battery bank or 48V battery bank, you’d need to wire this thermostat & fans on the downstream side of your 24/48-12V converter. If you try to connect 12V computer fans to a 24V/48V battery bank without a step-down converter; you will damage the fans.
- The thermostat shown has a max claimed relay amperage of 20A. Computer fans generally operate at less than 1 amp, but please verify that the total fan load, even when using multiple fans, does not exceed the max amperage of the relay on the thermostat.
Advertisement:
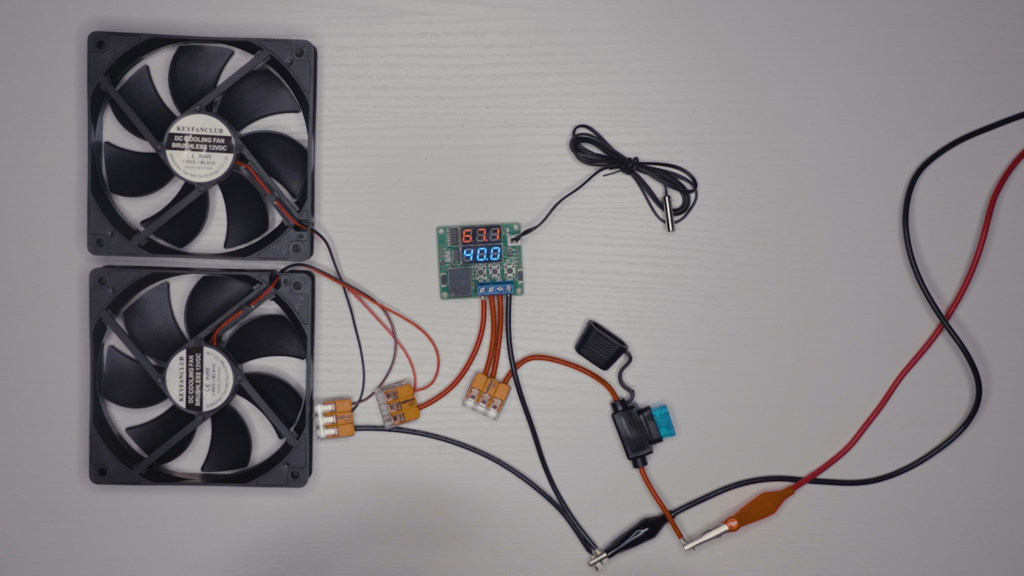
12V Thermostat Controlled Fan – Diagram
- Two power connections are necessary for the thermostat, which we have bridged at the thermostat, both of which will normally come from the far right stud of the Lynx Distributor which the battery bank powers:
- Power delivered to thermostat
- Power delivered to the fan
- There must be a fuse in place to protect the wire coming from the Lynx Distributor, through the thermostat, and to the fan. Use a 3-4A Inline fuse (listed in parts needed section above) for this.
- The power circuit is a standard ‘positive to positive and negative to negative’ circuit with the positive wire being ‘broken’ by the relay of the thermostat. Power from Lynx Distributor to the ‘k1’ port and out from the ‘k0’ port.
Advertisement:
12V Thermostat Controlled Fan – How it works
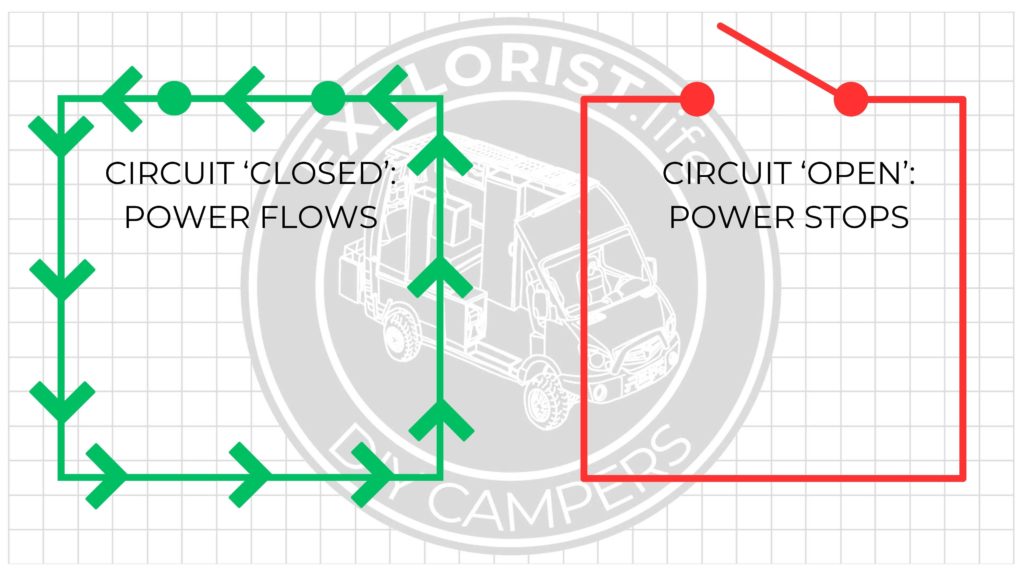
The ‘relay’ port of the thermostat is simply an on/off switch and connects/disconnects the wires connected to it based on the parameters we will program it for in the following steps. We are delivering power to ‘k1’, and power is coming out of the ‘k0’ terminal to the fans.
This means that the circuit is normally ‘open’, aka power is not flowing; and when the thermostat flips the ‘switch’ -> the circuit closes -> and allows power to flow.
Advertisement:
12V Thermostat Controlled Fan – Programming
Once everything is connected properly, follow the following steps to program the relay/thermostat to turn on/off at the desired temperature:
- Press the ‘Set’ button to change the temperatue at which the fans will turn off/on by 10 degrees. Press the + – buttons to change by an increment of .1 degrees.
- Press and HOLD the set button until P0 shows up on the screen and press the + or – button to change the H (heating) to C (cooling).
Understanding the significance of ventilation in a Van/RV electrical enclosure is crucial to maintaining optimal system performance. As electronic components, like chargers, operate, they generate heat that must be effectively managed to prevent overheating issues. This blog post has taught you to utilize a simple 12V thermostat for controlling computer fans, ensuring your system remains within safe temperature ranges.
