The Victron Cerbo GX is an electrical system monitoring device that takes the inputs from Victron Battery Monitors, solar charge controllers, Inverters, temperature sensors, tank sensors, and much more – and organizes that data for display on an external touch screen or remotely through the Victron VRM Portal.
Now let’s dive in a bit deeper and get into more of the specifics, starting with:
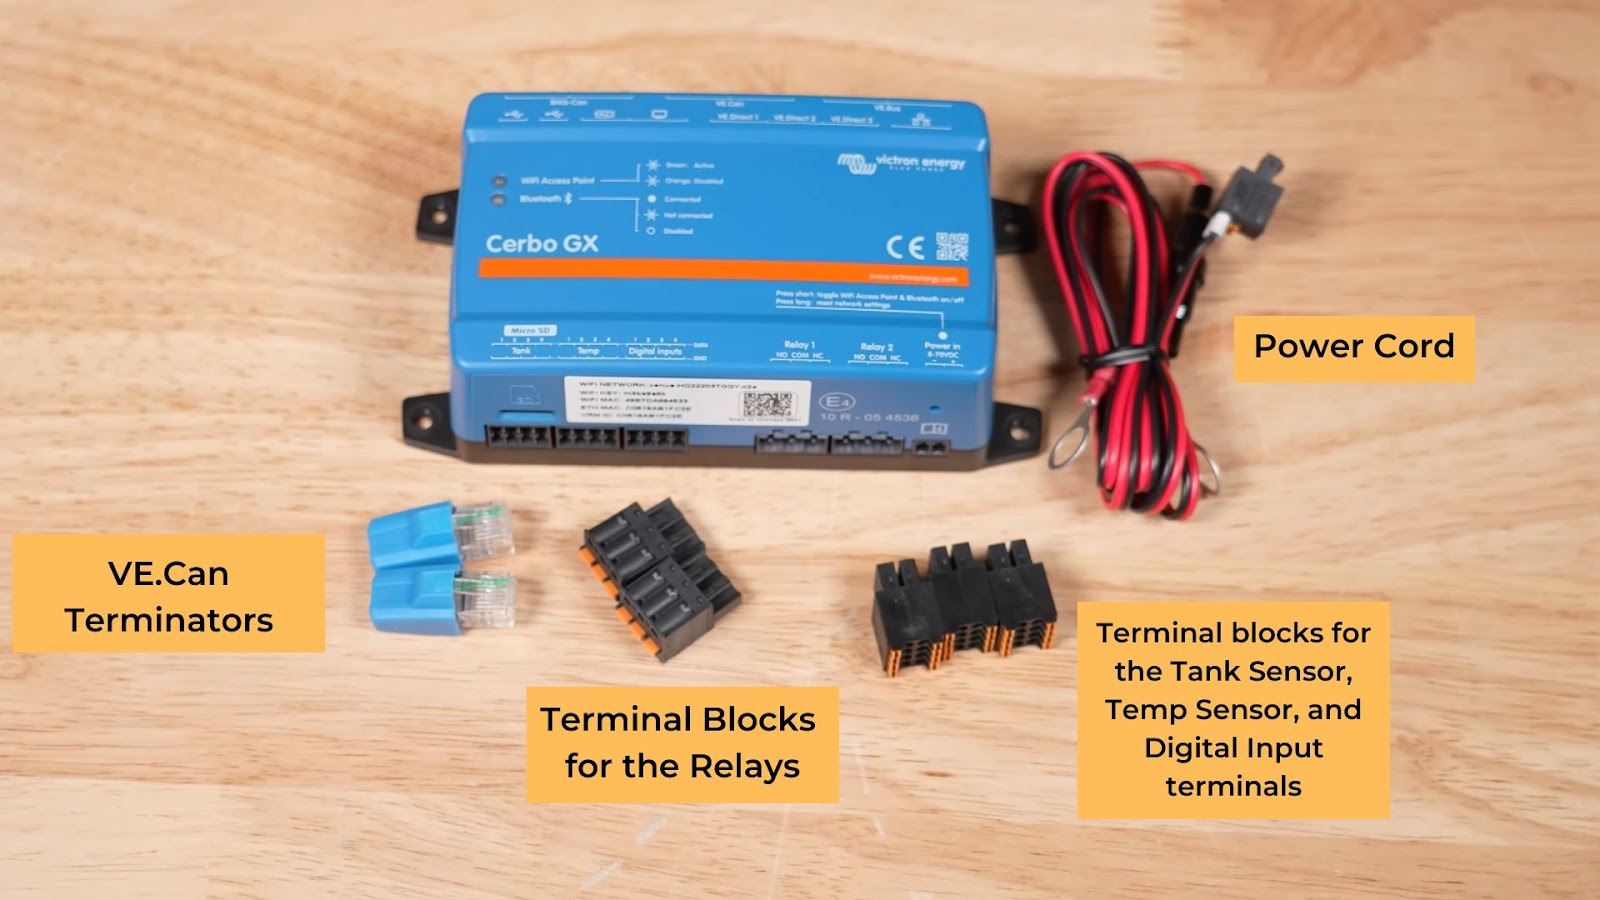
What’s in the box.
So, in the box, we have:
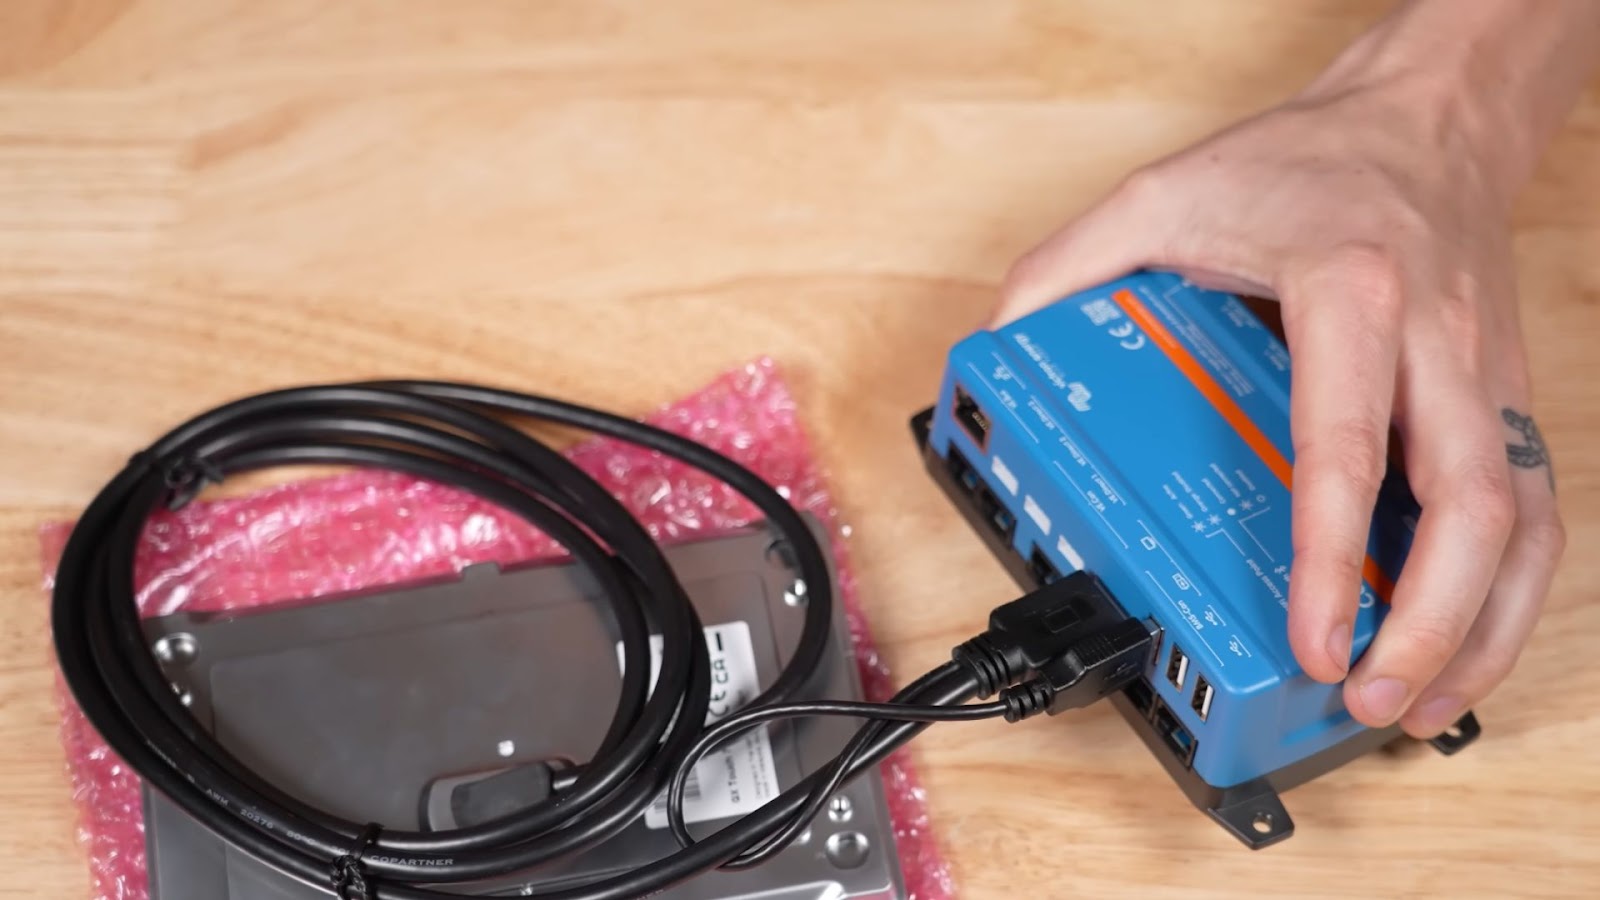
- The Cerbo GX
- The Power Cord
- VE.Can Terminators
- Terminal Blocks for the Relays
- and terminal blocks for the Tank Sensor, Temp Sensor, and Digital Input terminals
Also important to have on hand is the User Manual for the Cerbo GX
Now, the best way for us to tackle as many functions as we can, is to start from the outside and just look at what ports are available.
CANbus:
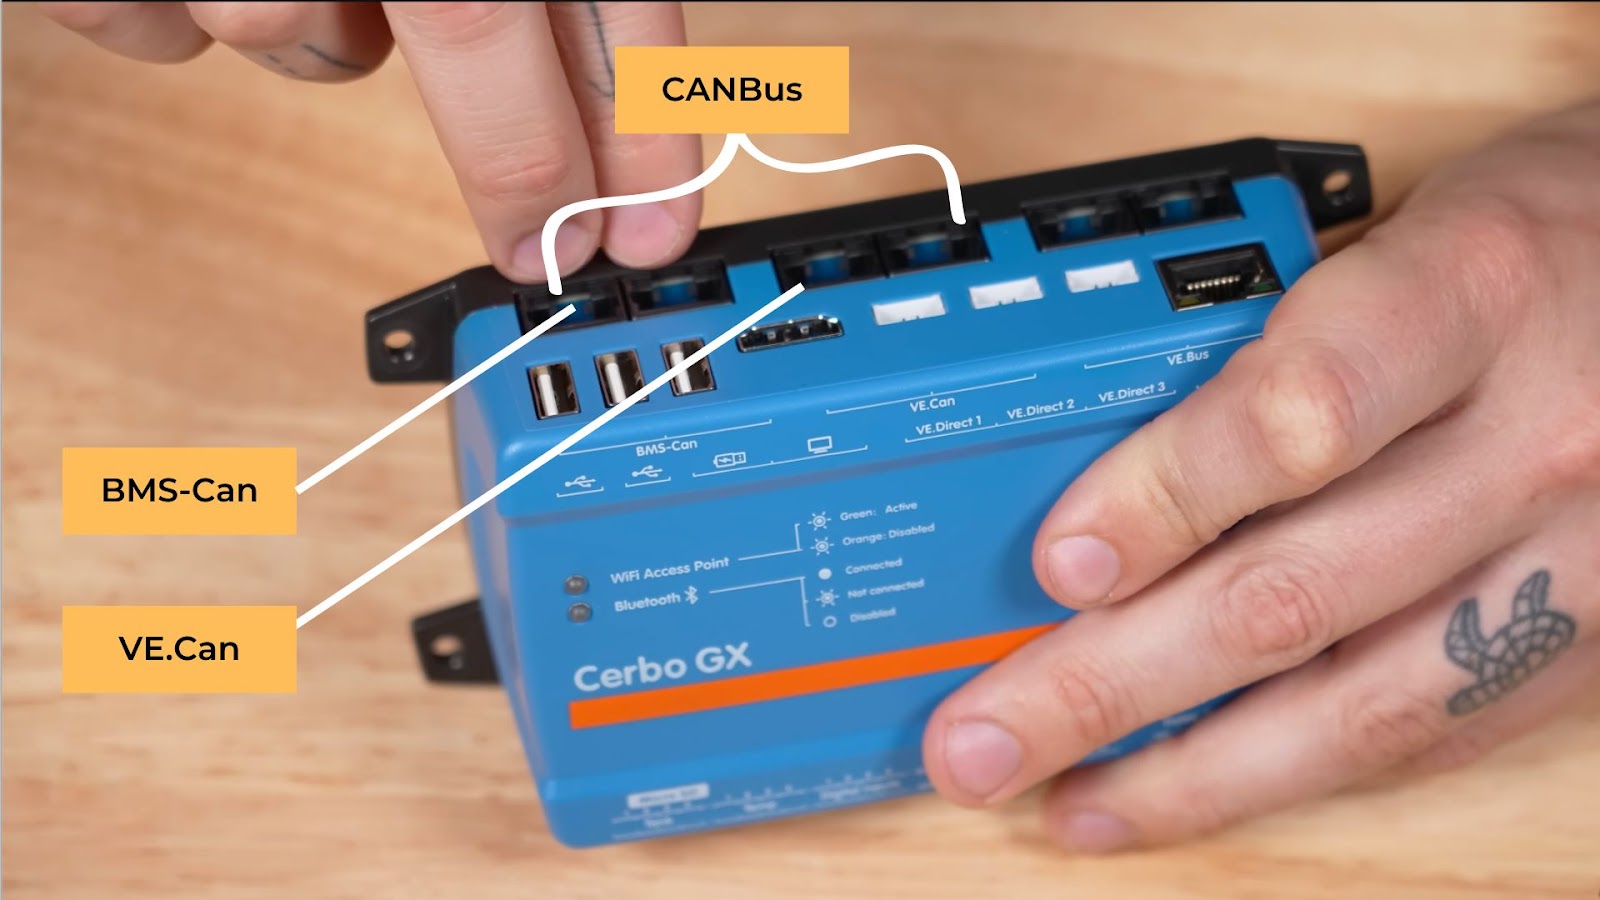
The 4 top-left most terminals are the four CANbus Interfaces and are broken up into two BMS-Can Ports, and two VE.Can ports.
BMS-Can
BMS-Can is intended to be used with compatible managed battery systems, such as Pylontech, BYD, Freedomwon and many more so they can send their data for display through the Cerbo GX.
VE.Can

VE.Can is intended to be used for the Victron (and Victron compatible) VE.Can products, such as the VE.Can MPPT solar charge controllers, and the VE.Can Lynx Shunt. The VE.Can Connection allows these components to communicate with each other. These devices can be connected in a ‘daisy chain’ fashion but you must use the included VE.Can terminators in the unused ports at each end.
VE.Bus
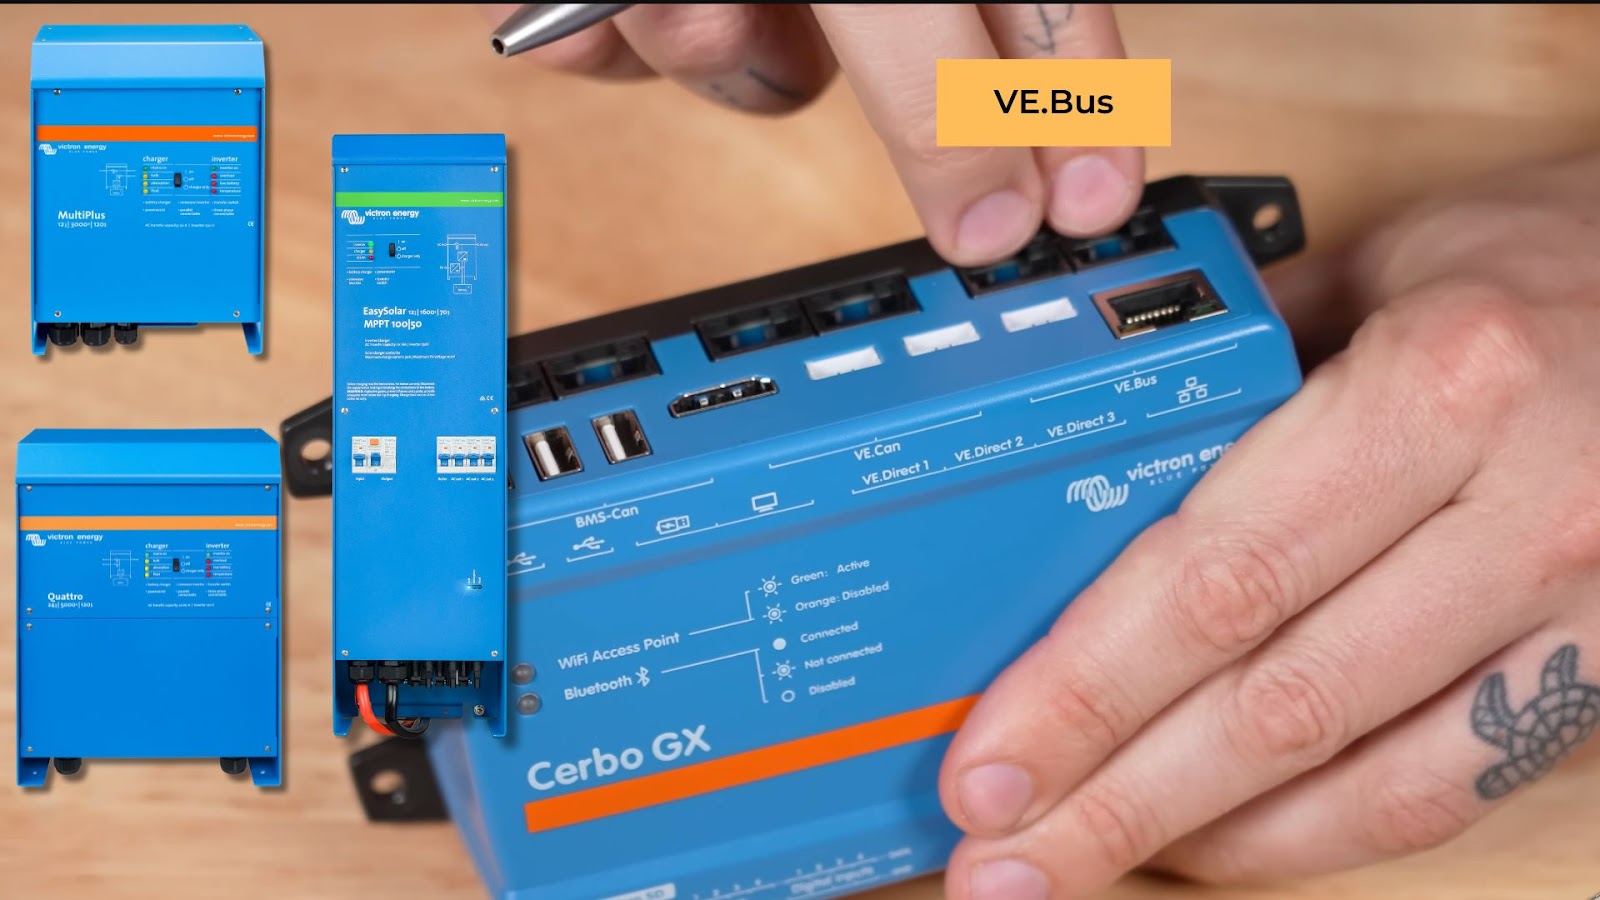
The VE.Bus Ports allow the Cerbo GX to communicate with, and control Victron Inverter/Chargers like the Multiplus, the Quattro, or the Easy Solar.
RJ-45 UTP Cables
The BMS-Can, VE.Can, and VE.Bus connections ALL use RJ-45 UTP cables. For best and most consistent results, you should use the Victron brand of cables. If you are having issues with a component and are using 3rd party cables; swapping to a Victron branded cables is a cheap place to begin troubleshooting.
USB
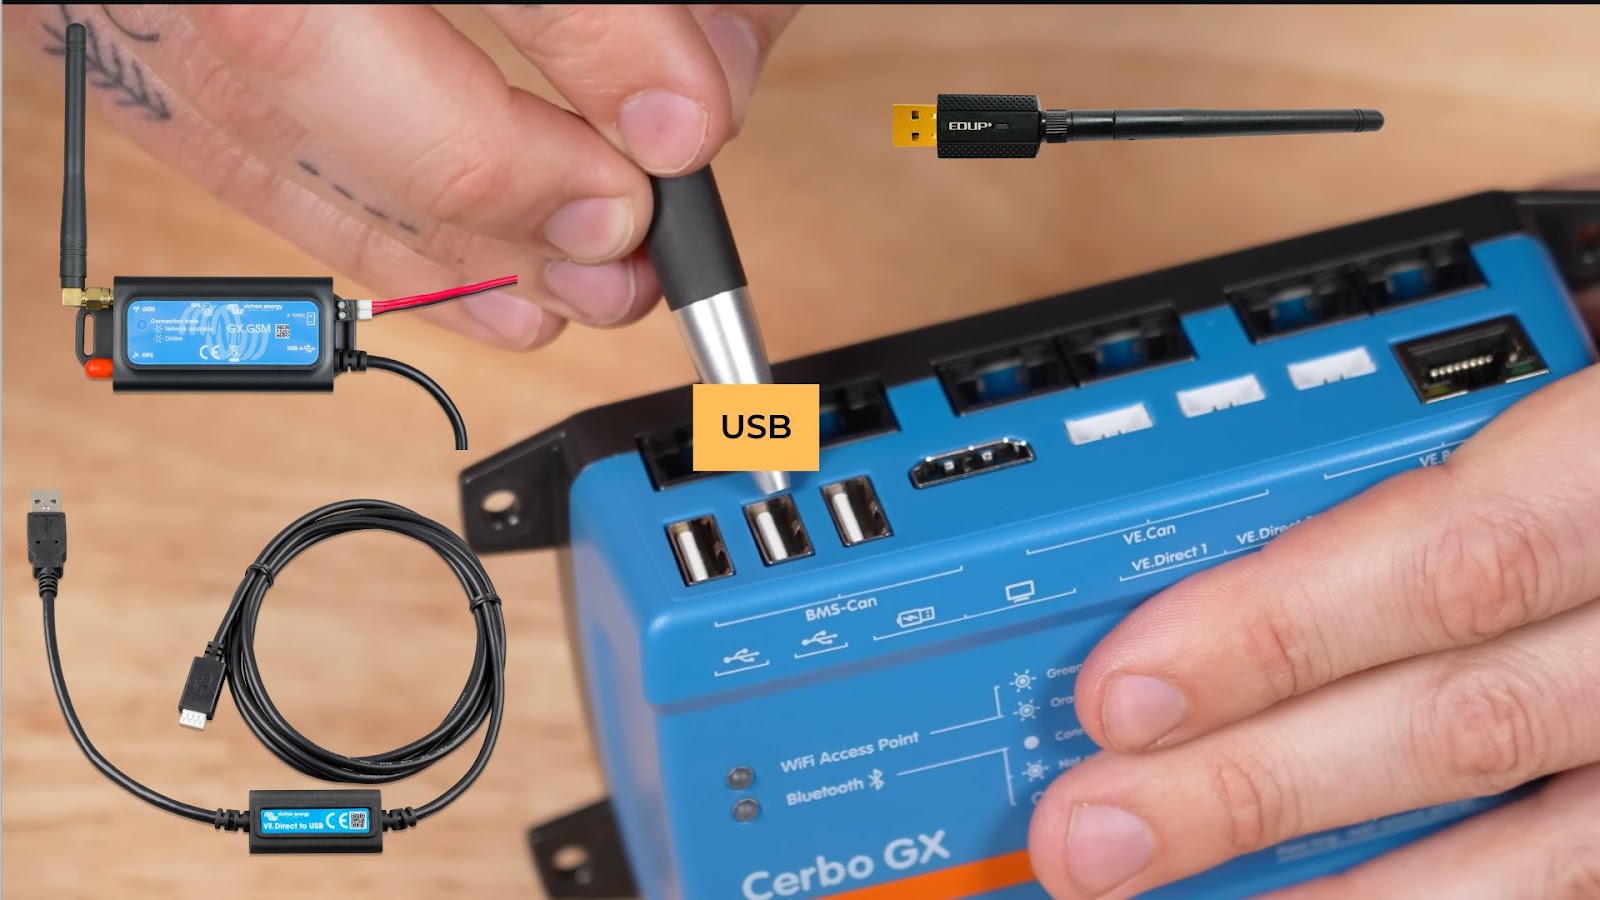
The two USB outlets are for connecting any number of USB devices. Most useful would likely be:
- GX GSM for internet connectivity via a cellular network
- WiFi dongles for extra range, since the Cerbo GX has wifi built in.
- Or even attaching a keyboard.
Quite a few options there, as with any USB device.
The remaining USB outlet, noted with a little lightning bolt, is for powering the Victron Touch 50 or Touch 70 Display; which we will talk about next.
HDMI
The HDMI terminal is for delivering the display data to the Victron Touch 50 or Touch 70 Display screen. Here is the Touch 70, 7-inch screen. The Touch 50 is just a bit smaller at only 5in; but that’s the only difference. The attached cord has a HDMI connection and a USB connection. The HDMI goes to the HDMI port for data transmission, and the USB goes to the USB power connection for delivering power to the screen.
VE.Direct
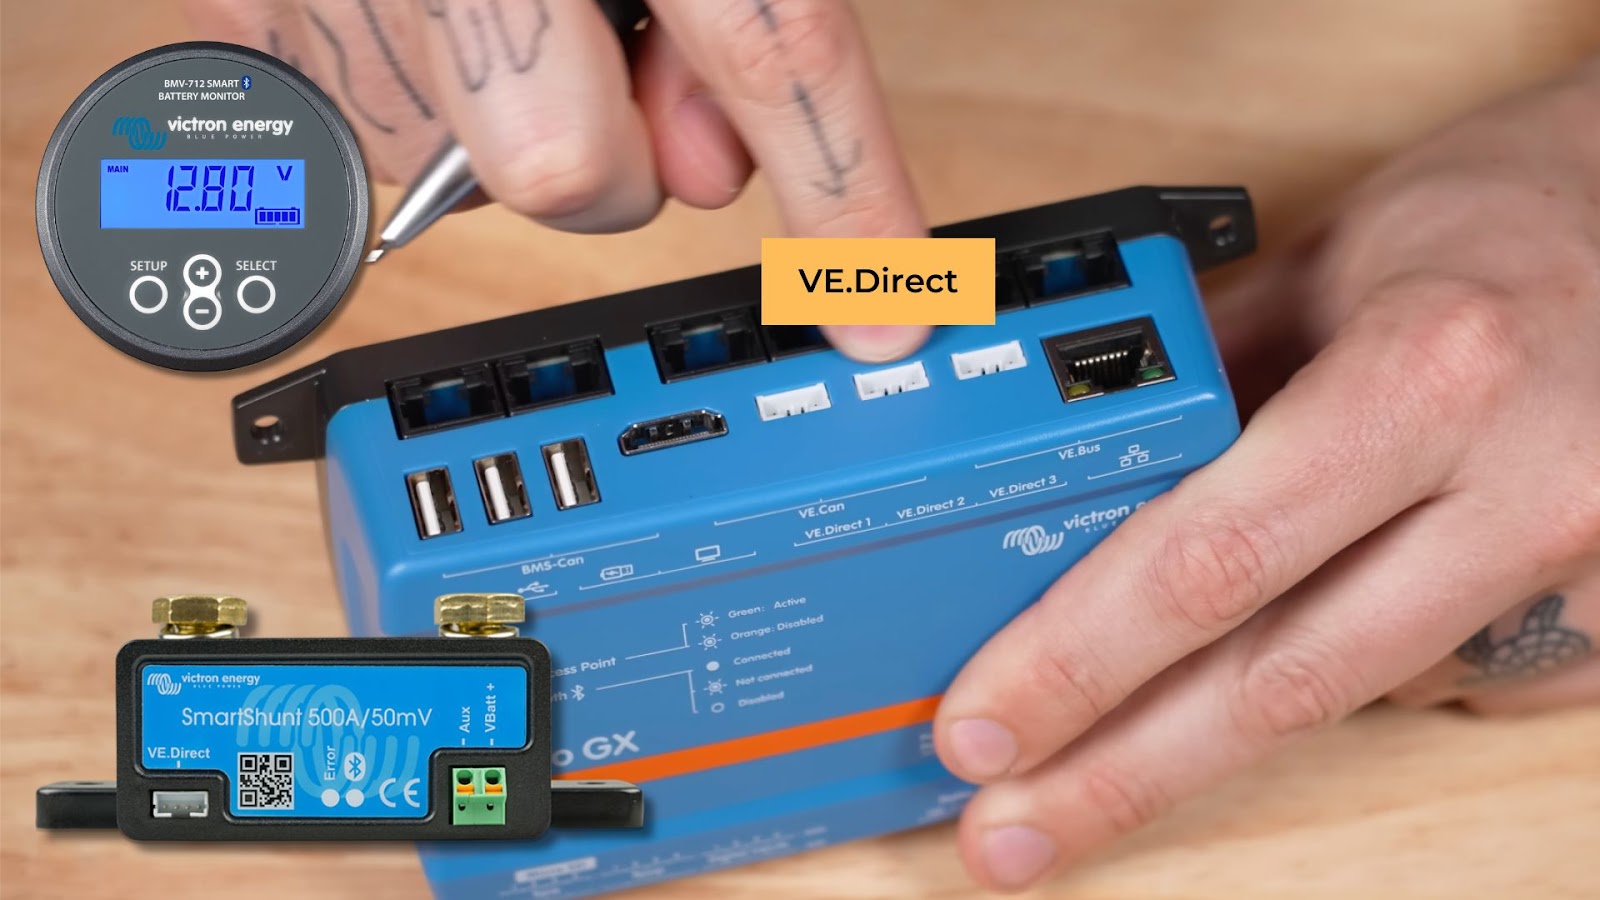
VE.Direct allows the Cerbo GX to communicate with Battery Monitors like the Victron BMV-712 or the SmartShunt. This allows the Cerbo GX to ‘see’ what those battery monitors see, so that the Cerbo GX can forward the info from the Battery Monitors on to the Touch 70 Display and the VRM Portal; which we will talk about later.
VE.Direct also allows for connection to the Victron MPPT Solar Charge Controllers and essentially turns the Cerbo GX into an active controller for all connected solar charge controllers through a function called DVCC, which stands for Distributed Voltage and Current Control. DVCC gives us helpful features like the ability to limit total system charging current if we, for example, have more solar than our batteries are allowed to charge at. DVCC is pretty powerful, and there is a whole chapter dedicated to it in the user manual.
There are only three VE.Direct Ports on the Cerbo GX, but more can be added by using a VE.Direct to USB interface cord with a USB hub connected to one of the USB ports we mentioned earlier.
Ethernet
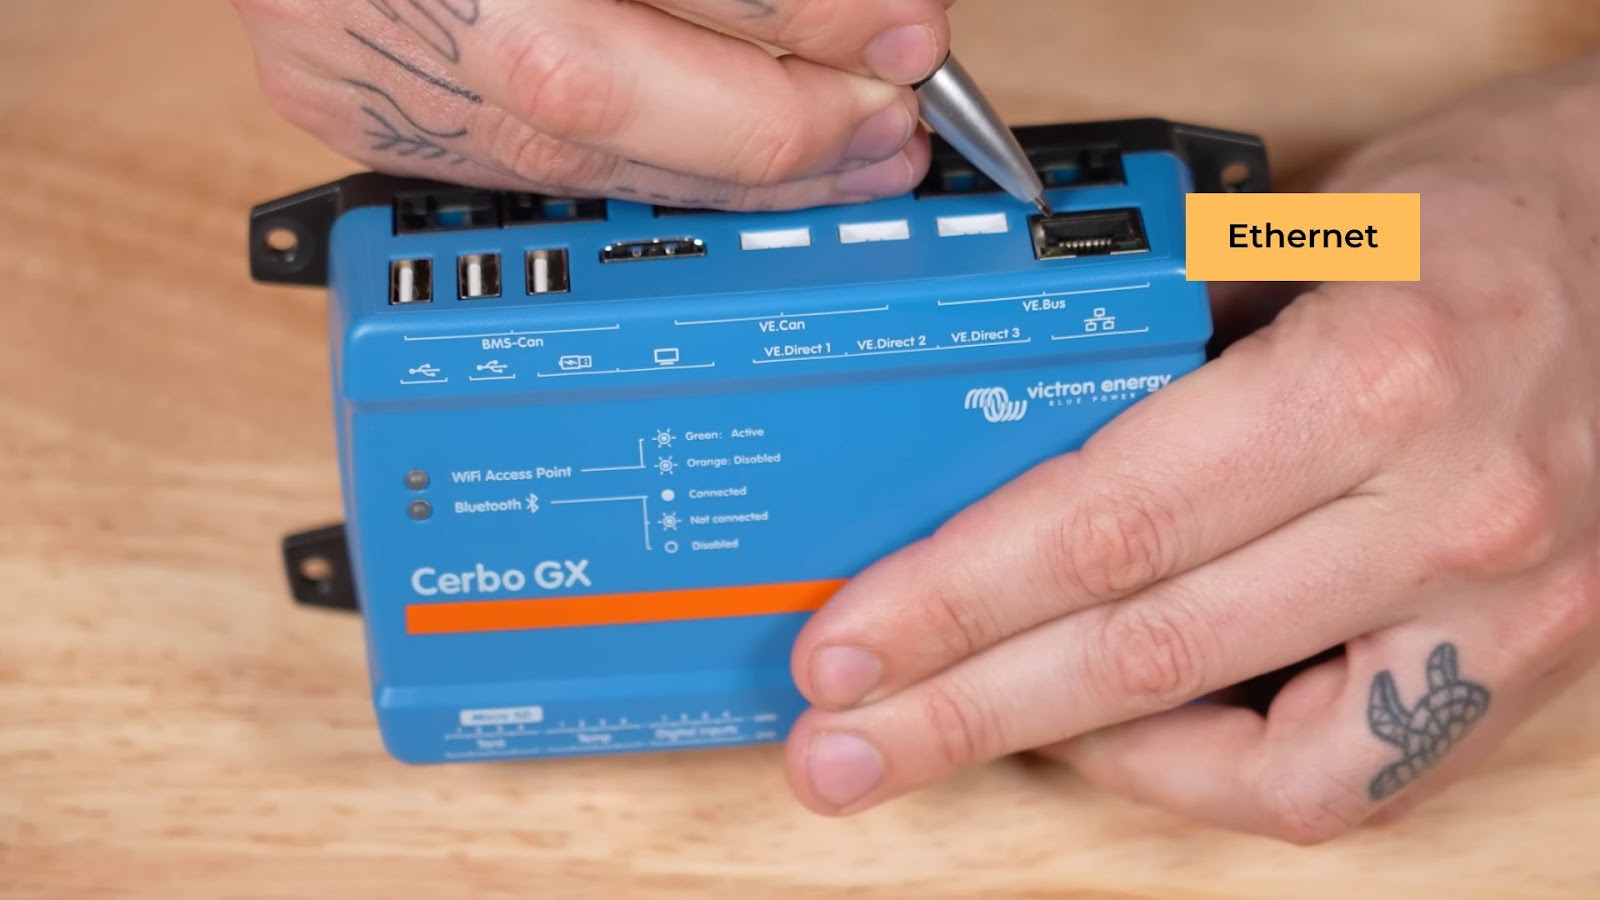
The last remaining port on this side of the Cerbo GX is the Ethernet port; which simply allows for a wired connection to a router or other appropriate wired local area network device.
Now, that’s all of the ports on the top side; lets move around to the bottom side.
Micro SD
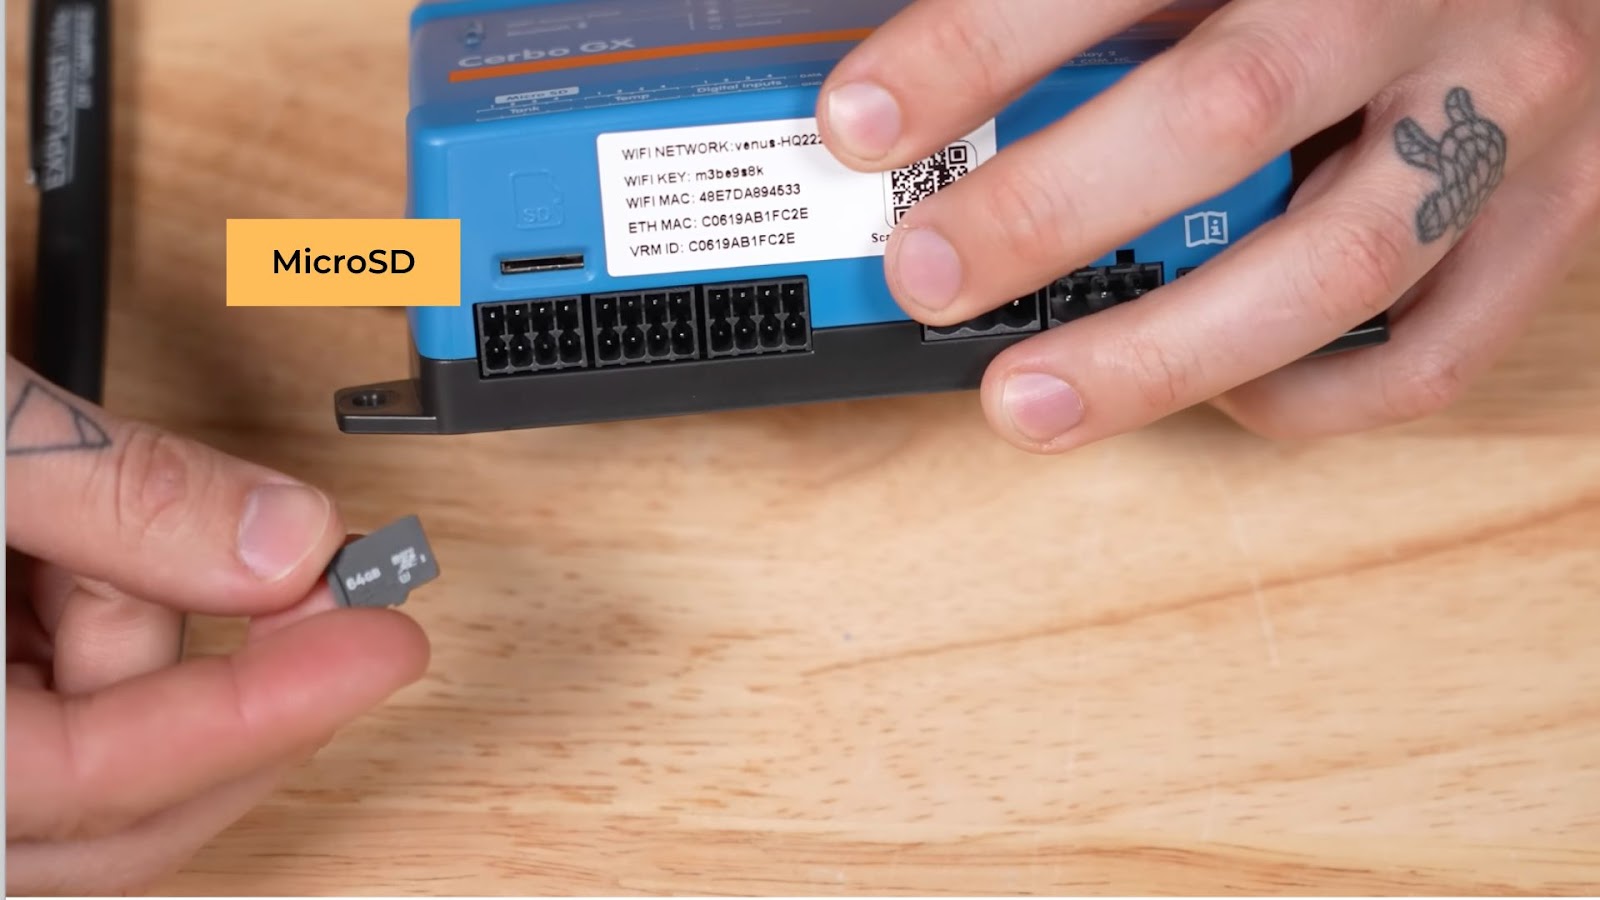
The Micro SD card slot is for updating the Cerbo GX when there is no possibility for direct internet connection. You can upload the firmware to a micro SD card, and then the Cerbo can update from that.
Tank Sensors
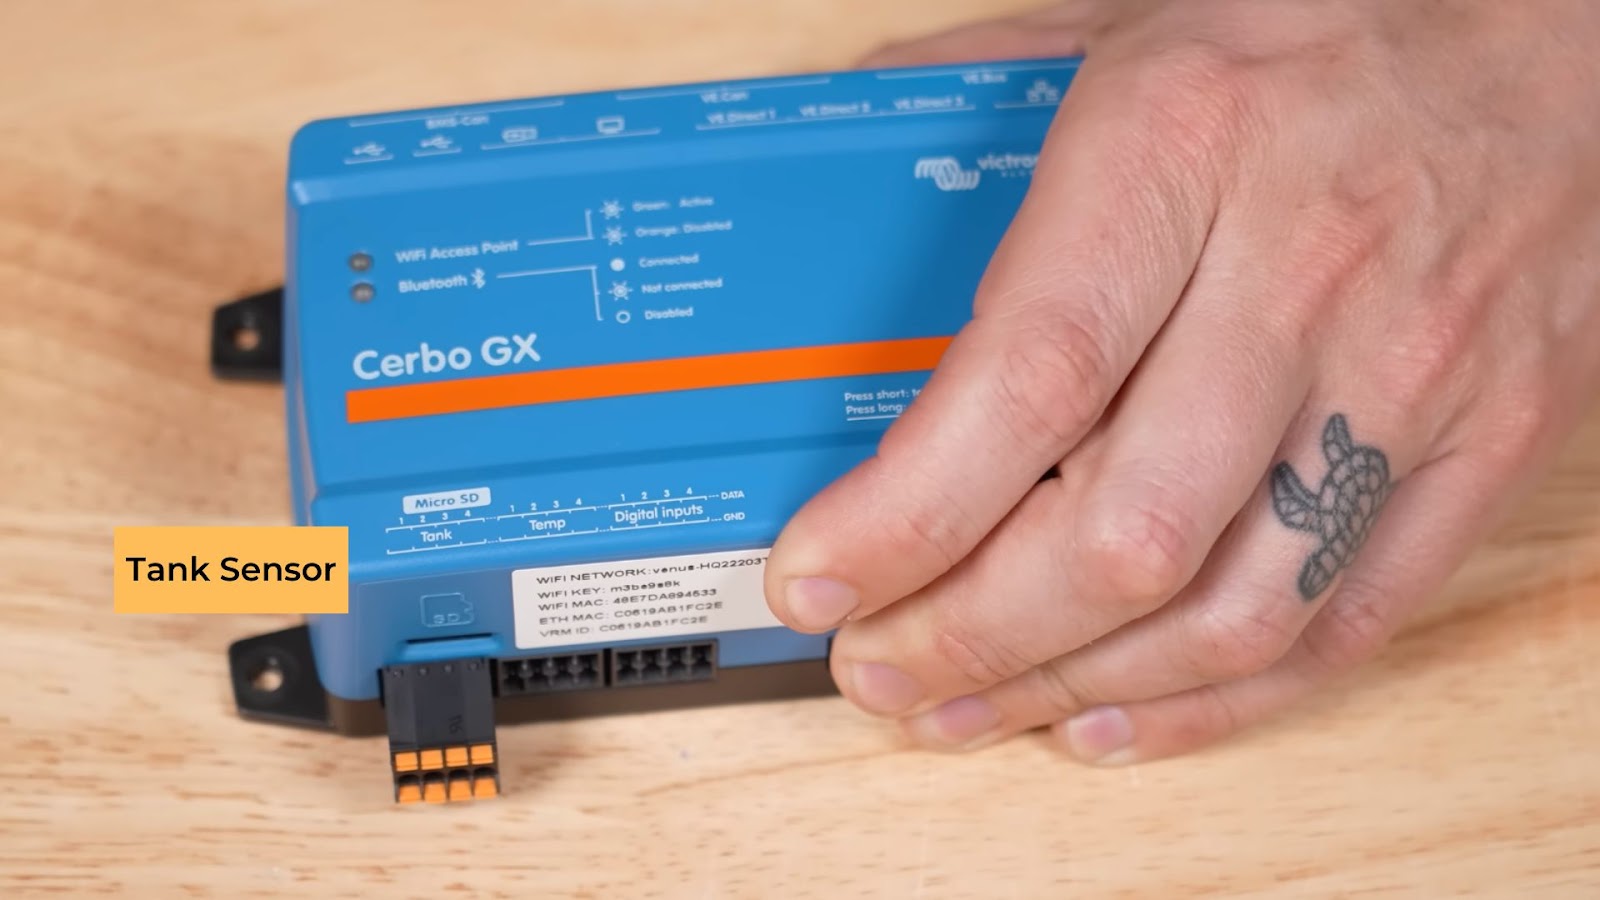
The Tank sensor Inputs are for resistive tank senders; like these float valve sending units. There are other types, but these are pretty common and really easy to set up and can be shown as fresh water, grey water, fuel, oil, black water, or even a live well.
Temperature sensors
There are inputs for hard wired temperature sensors; which is a great option for displaying temperature information on the Touch 70 or the VRM portal, but is also super powerful when using the temperature data to control a relay, which we will talk about in a bit.
Digital Inputs:

These digital inputs are for ‘other’ compatible things you want to monitor like door alarms, bilge pumps, bilge alarms, burglar alarm, smoke alarms, and all kinds of other stuff.
Relay 1&2:
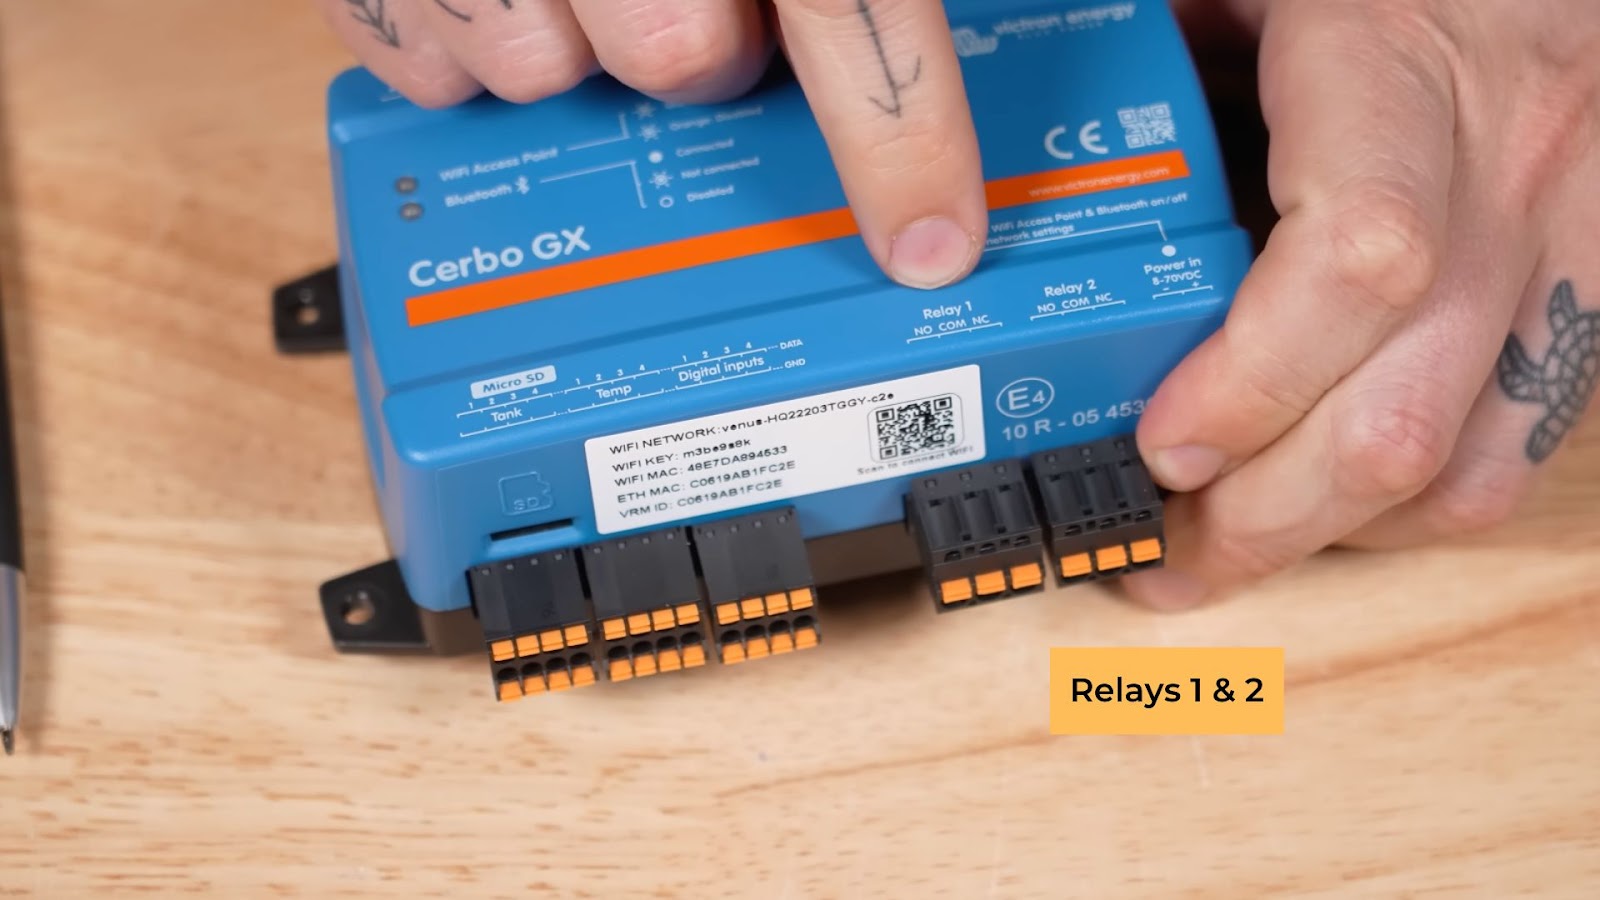
The Relay terminals are for allowing the Cerbo GX to control an external relay to turn something on or off depending on various set-points that can be programmed within the Cerbo GX, for example, a generator auto start, a buzzer, a warning light, an alarm, a hot air vent, or anything else that a relay could normally control.
Power Terminal:
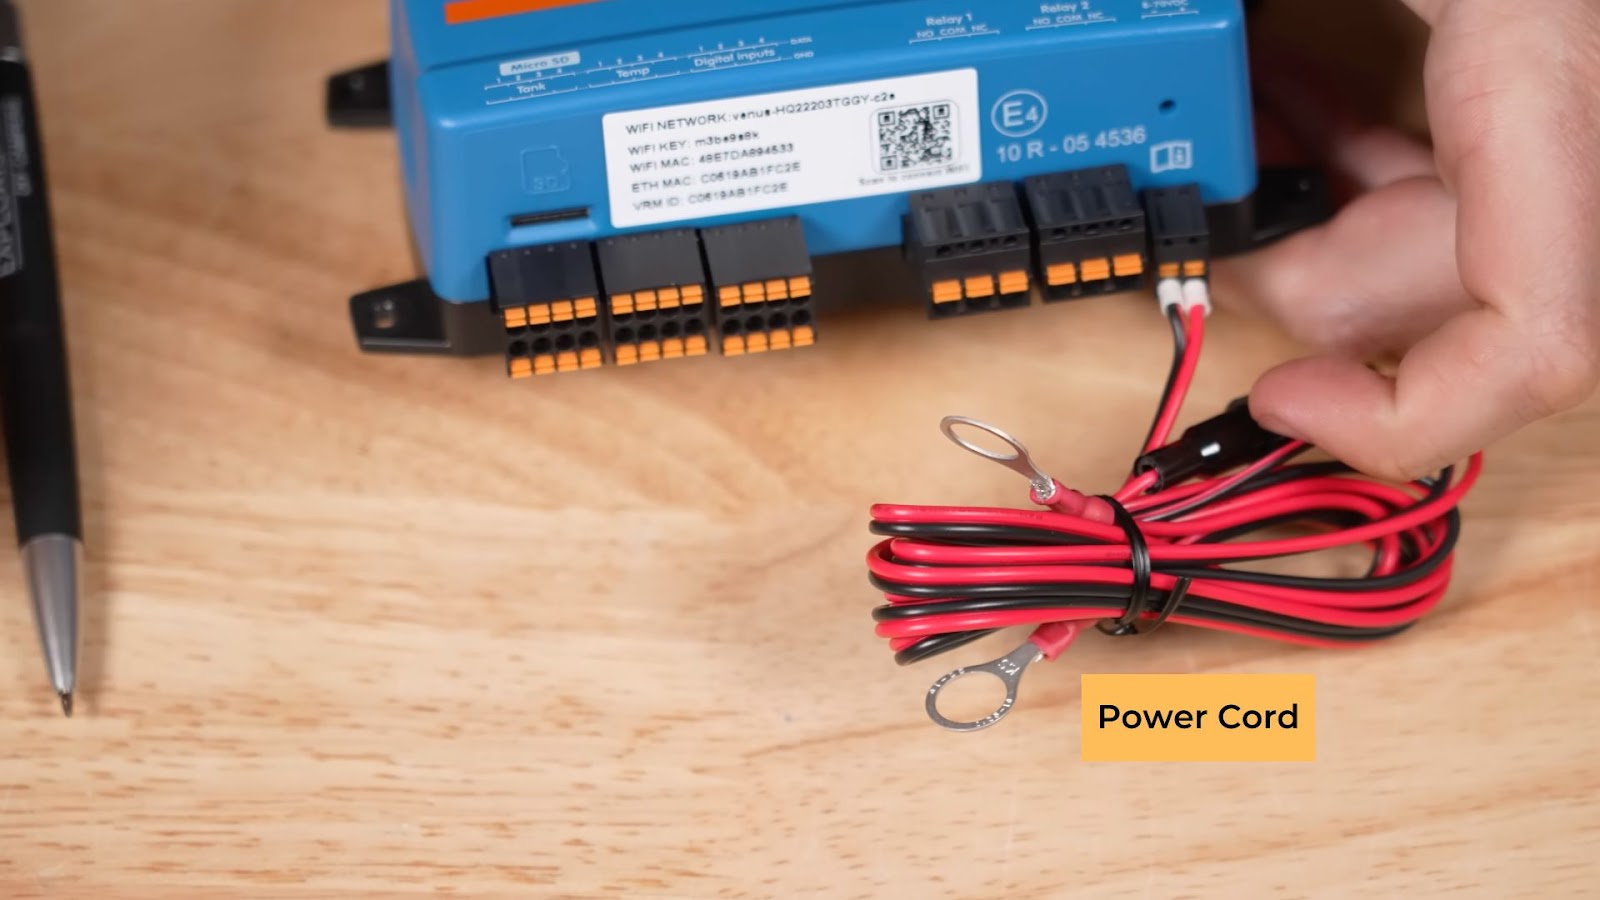
And lastly is the power terminal, which uses the included wiring to connect to your battery, or DC busbar system, like your Lynx Distributor.
And that’s all of the terminals. I think by going through what each of the terminals should connect to, now we have a pretty good grasp of the capabilities of the Cerbo GX.
Connecting the Victron Cerbo GX to Power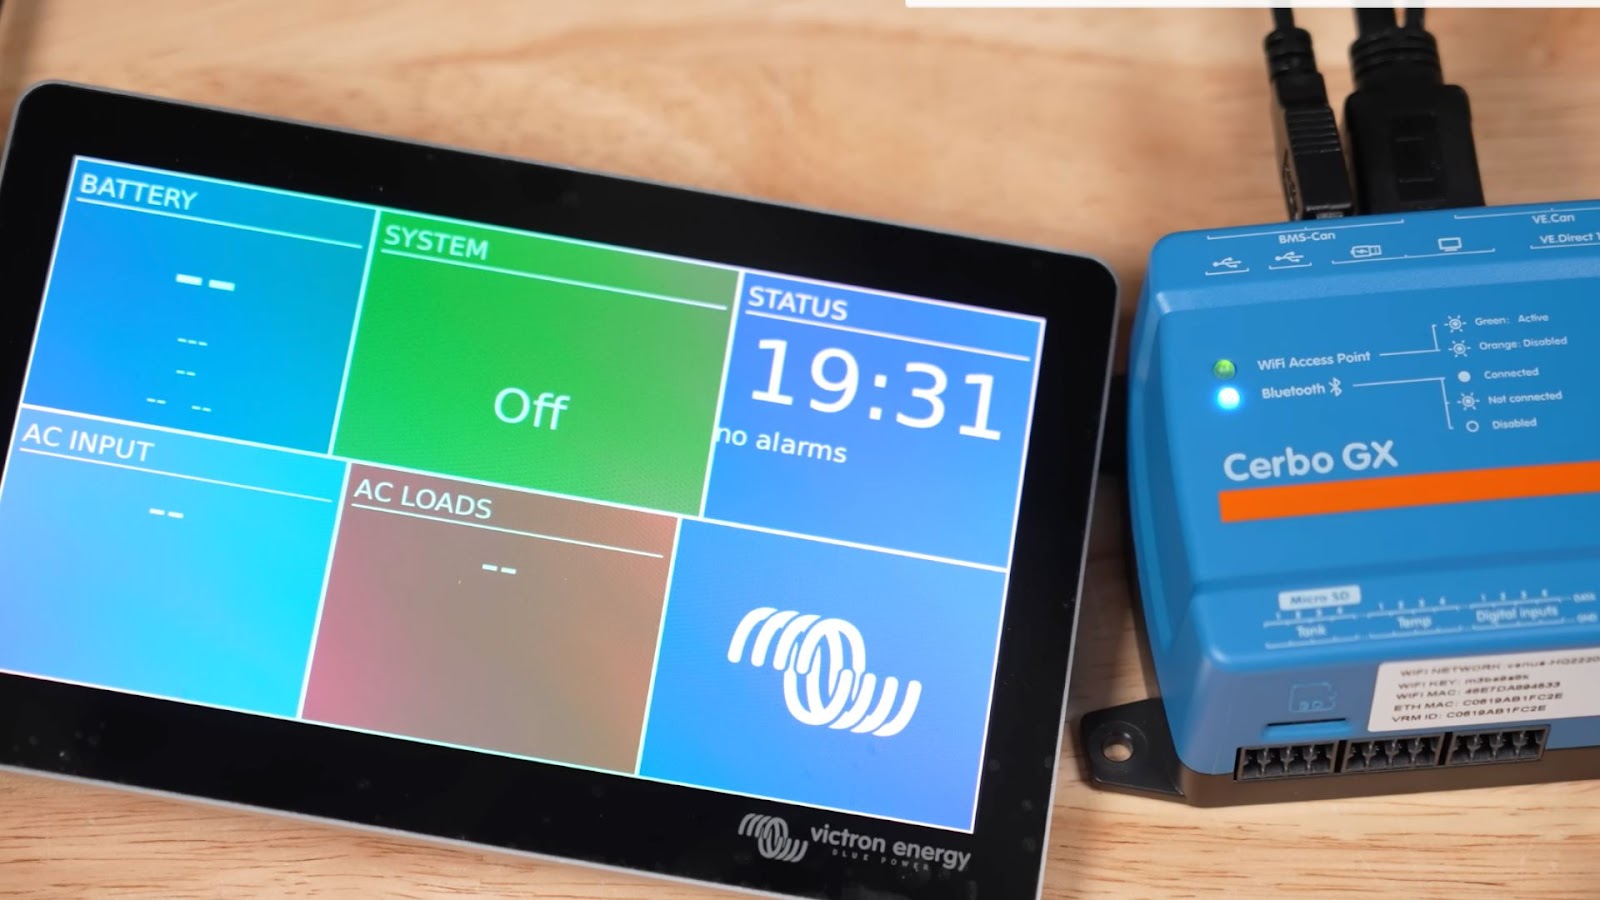
Connect the HDMI to the HDMI port and the USB to the USB Power port. Then connect the power wire to DC power, which will be your batteries or system busbar like a Victron Lynx Distributor.
After a few seconds of initial boot-up, you will see the Cerbo GX home screen.
We can see our system flow of power page and an additional ‘at a glance’ page. We also have our menu button down here that is absolutely LOADED with options. Remember, this is a computer, so there are many settings, options, toggles, and such. If you want to check out all the available menu options and what they do, check out chapter 5 of the user manual, as it’s VERY thorough and helpful.
Cerbo GX in the Transit
Our Ford Transit camper conversion has a fully functioning Victron system with a Cerbo GX installed. In the video below, you can see a live demo of the Cerbo GX in a system.
Watch: Victron Cerbo GX 101

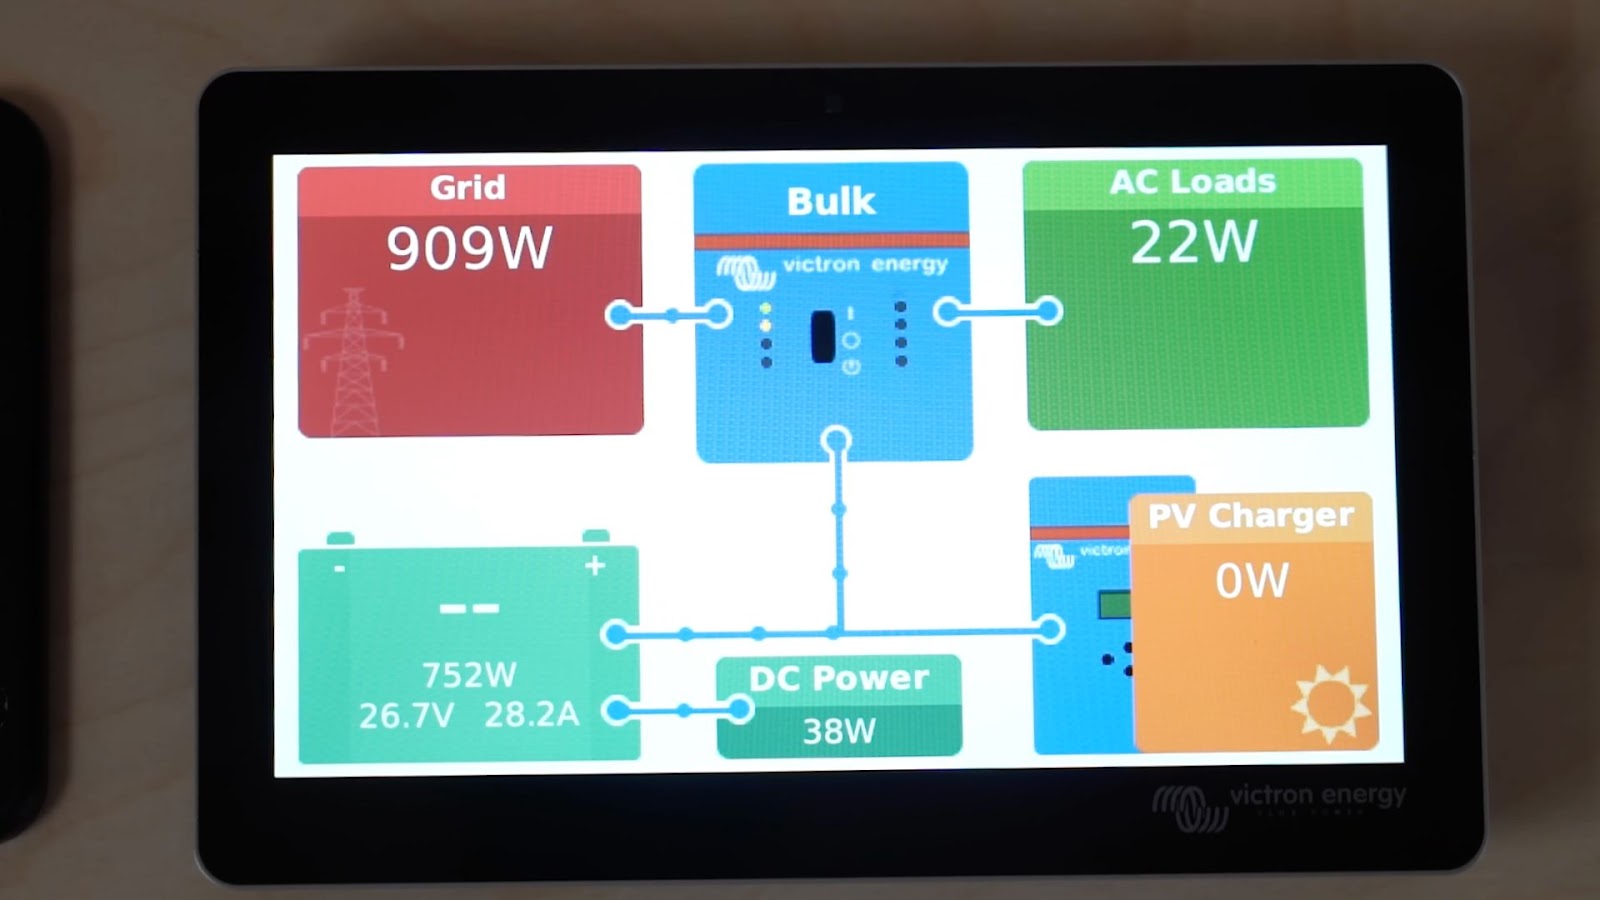
Our Victron Multiplus inverter/charger is connected to the VE.Bus port on the Cerbo GX with an RJ45 UTP cable, and when we are connected to shore power and charging, the Cerbo GX is showing that flow of power from shore power pedestal through the Multiplus into the batteries.
If we disconnect from shore power and turn on a 120V load, the flow of power will change and show that we are pulling power from the batteries – inverting that power from DC to AC – and feeding that to our 120V AC loads.
If we connect a solar charge controller to the VE.Direct port on the Cerbo GX with a VE.Direct cable, or the VE.Can port with an RJ45 cable; the Cerbo GX will start to show how much power our solar panels are pushing into the system to either charge our batteries or power our loads.
If we connect a Battery monitor like a Lynx Shunt through VE.Can, BMV-712 through VE.Direct, or smart shunt through VE.Direct to our Cerbo GX and turn on a DC load, the shunt will tell the Cerbo GX how much DC power is leaving the batteries.
Do I Need a Shunt if I have a Cerbo GX?
A common misconception about the Cerbo GX is that if you have a Cerbo GX in your system, you do not need a shunt, which isn’t necessarily true, especially if you are running a system with DC loads like in a camper, motorhome, or boat, you will need a shunt to provide the battery state of charge info TO the Cerbo GX.
If you have a system without DC loads like in an off grid cabin, you may not need a shunt because the Multiplus or Quattro inverter chargers and the Victron Solar Charge Controllers can tell the Cerbo GX how much power they are using or contributing to the system, and the Cerbo GX will work out and display the difference.
Lastly…
The VRM Portal
If your Cerbo GX has an internet signal through wifi, ethernet, or cellular network; you will be able to connect your Cerbo GX to the VRM Portal and view your system status from anywhere in the world – so you can check in and make sure everything is working properly and get alerts for if something is wrong.
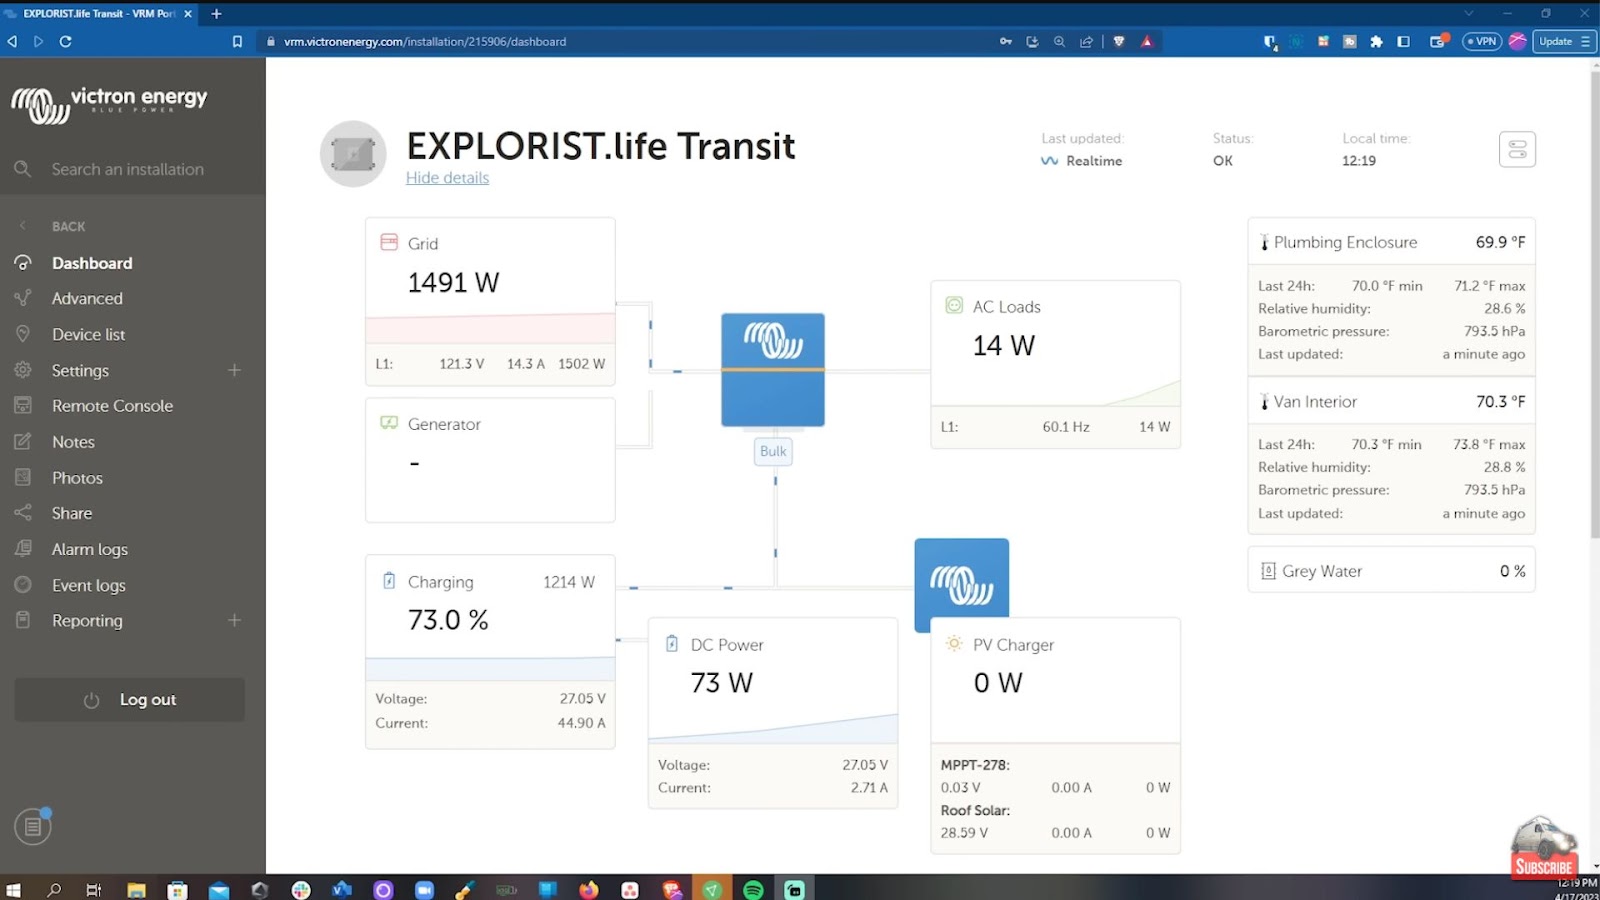
Here is what the VRM portal looks like for our camper van. I currently have it connected to shore power, and that’s being shown on the VRM portal and it’s parked in our shop, so there is no solar coming in and since I’m not using it; there is no power going out.
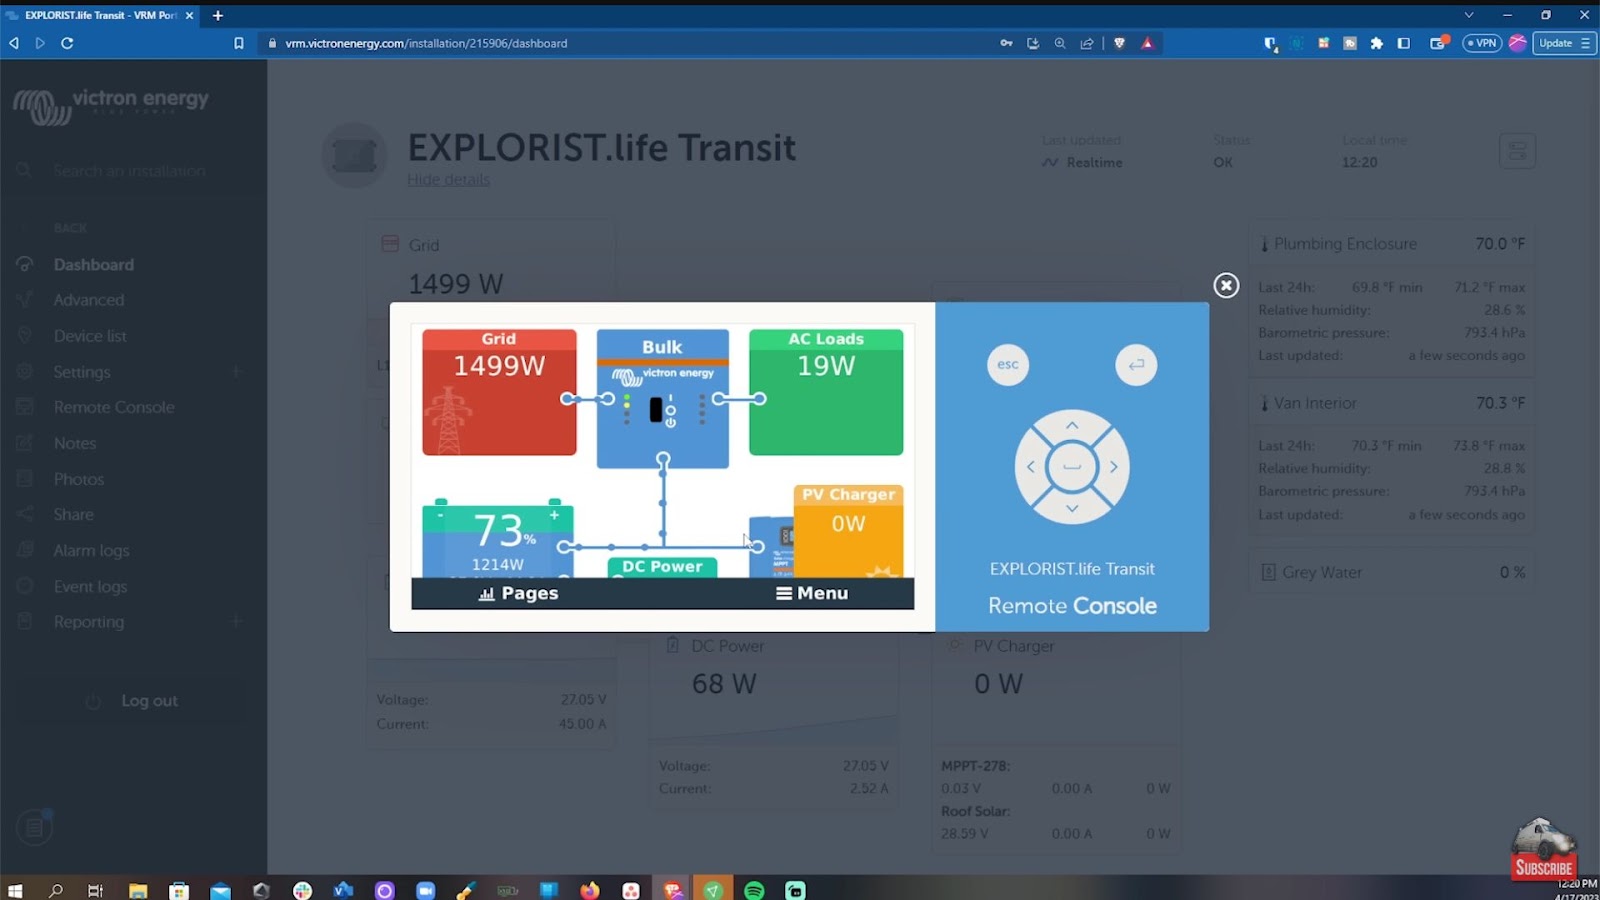
And if I needed to change settings remotely, Since I’m an administrator for my own account I could navigate to the Remote Console and access everything that I could as if I was standing there at my touch 70 display screen.
Now, here is another fun thing you can do…
If we go to vrm.victronenergy.com/world; you can check out all kinds of different systems from all around the world from users who have decided to make their system stats public.
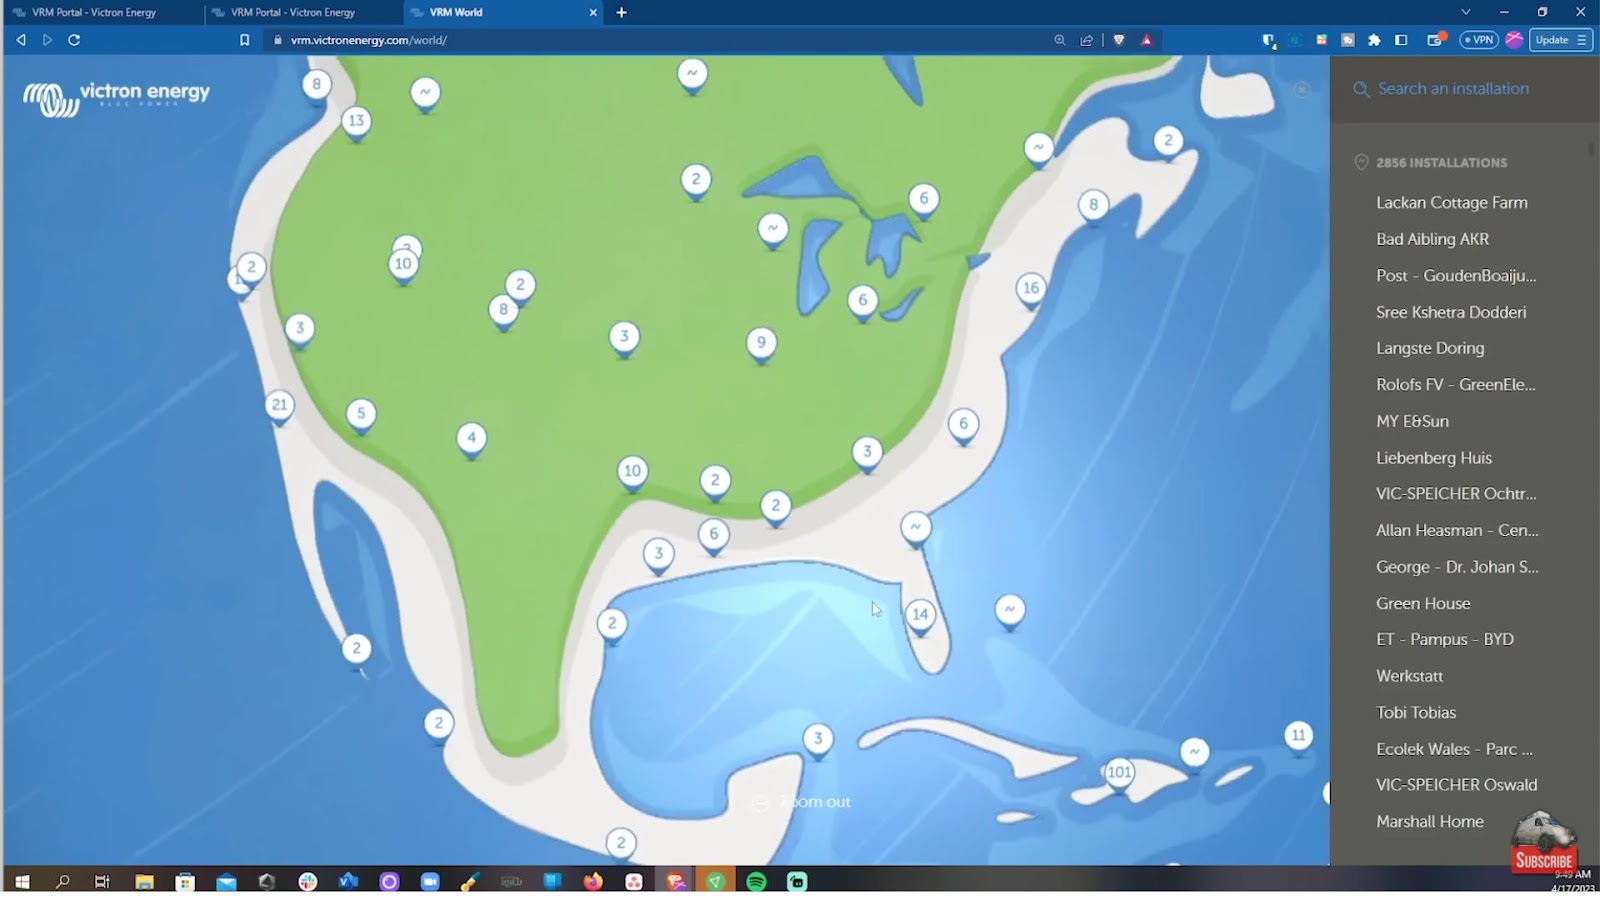
Now, it’s worth noting that you can’t change the settings of these publicly viewable installations unless you are an authorized user for that specific account, which the account owner has to give permission for.
It’s also worth noting that you don’t have to opt in to having your system publicly-viewable if you don’t want to. The Cerbo GX is an optional but great addition to your Victron-based electrical system if you are a stats and data nerd like myself.
