Battle Born just released their newest batteries to their family of LiFePO4 Batteries. We have all been asking them for a few years at this point to release a battery larger than 100 amp hours, and they’ve answered in a big way with two different 270Ah batteries coming in two different form factors.
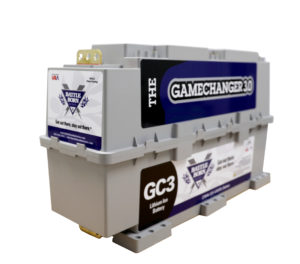
Battle Born BBGC3 270 Amp Hour Lithium Battery
The Battle Born BBGC3 is a 12V, 270Ah LiFePO4 Battery with an internal BMS. It doesn’t look like any other battery on the market that I’ve ever seen so it’s sure to turn some heads but more importantly… like all of the other Battle Born lithium batteries, it’s a drop-in battery, which means that it is designed to be a stand alone source of power storage with no need for an external BMS.
This battery is 22.83″ long x 7.09″ wide x 13.15″ tall for 270Ah of power as compared to their 100Ah Battery, which is 12.75″ long x 6.875″ wide x 9″ tall. This means that you can get 1.4 times the power in nearly the same footprint if you can spare the extra 4″ of battery height for the BBGC3.
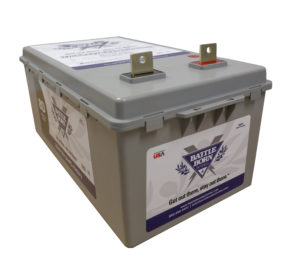
Battle Born BB8D Amp Hour Lithium Battery
This battery looks like and has the same dimensions as the standard 8D battery that is common in many OEM RV’s, but that’s where the similarities stop. This battery, like all of the other Battle Born batteries, is a drop-in replacement LiFePO4 Battery complete with an internal BMS.
This battery has a larger foot print than 2x 100Ah Battle Born Lithium Batteries, but is about an inch shorter and has an extra 70Ah of battery capacity.
BBGC3 VS BB8D
The BBGC3 and the BB8D are pretty much the same battery in everything other than their physical shape. They charge & discharge at the same rates. They have the same BMS parameters. They can both be wired into (up-to) a 48V battery bank. They have the same amp-hour capacity. They have the same 10-year warranty.
So, which one is best for your needs? I highly suspect that the BBGC3 will be better for the camper van crowd as van electrical installs are usually more ‘vertical’ and the tall/slim nature of the BBGC3 will likely work better in that regard.
The BB8D will 100% be better for those OEM RV’s that have a factory installed 8D sized battery installed as the factory house battery.
Ultimately, though… you’ll just have to break out the tape measure, some elbow grease, and some CAD (Cardboard Aided Design) to see which size of battery will work best in YOUR space.
Old vs New – Battle Born Batteries
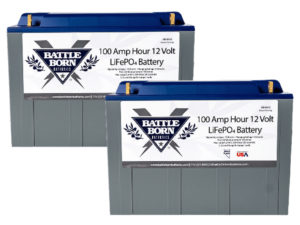
The Original 100Ah Battle Born Batteries are still wonderfully awesome batteries and I will very much continue to recommend them here on EXPLORIST.life. The smaller size gives a bit more flexibility in where/how you can configure your battery bank. Ultimately, though, it’s REALLY nice to have options at this point.
The main draw to the bigger battery banks is that you can pack more power into a smaller space and will rely on fewer battery-to-battery connections to make a large battery bank. This means less wiring and a more balanced discharge from the battery bank.
If you want to check out more info about any of these batteries, click the links below to be taken directly to the Battle Born website where you can find all of the specs and figures.
Thanks for reading and I hope you found this blog post helpful and if you did… It’d be awesome if you would share it with somebody, or a group, who you think could use it. Hit the like button, and leave any questions you’ve got in the comments section below. Subscribe if you want to see more DIY camper building tutorials and I… will see you in the next project.

14 Responses
Outstanding. Informative in a very easy to understand way.
You Rock Nate,
The local solar guy says for a big system, i want a 48V system… And he has 48V Lithium batteries available (actually seem a better deal) My issue with them is that they are 75lbs each. I live in canada and theres a good chance I will occasionally have to disconnect them and take them inside and id really rather deal with 30lb things I can viably carry around.
You make no mention of 48V batteries yet you say even these 12V batteries are capable of 48V systems. And I watched your vid on how not to think of Solar panels as any specific voltage. Are batteries the same? Can I use the 48V ones with your wiring diagrams? Do I need special wiring diagrams?
I can get…12V Lithium 100Ah/1200Wh for $1400
but 48V Lithium 3200Wh are $3000
Batteries need to be thought of as 12v, 24v, and 48v. I do not have any diagrams with 48v batteries as of today. 48v batteries cannot be swapped into my diagrams without major alterations. I only recommend 48v systems if more than 6000w of inverting power is needed or if more than 2700w of solar is needed.
Excellent. I have done more research and I have learned SO much! For our system, we are going to need a lot of power (But not big loads…small loads for a long time) Our biggest is we need to power two computers, extra monitors, router etc. (600W) for possibly 12 hours a day. And what with Canadian Winters providing 1 hour of useable sunlight a day (If we are lucky) that means a lot of batteries. So it will be that sort of a big system. But we don’t need Air conditioning and we have a gas generator for the power tools. All good. 12 V system is going to be fine! Thanks so much!
I’m converting a 20′ box truck into an RV that I want to live in
full-time, so I want some powerful batteries and solar. I’m a novice at
this, and I haven’t found the exact kinds of information I need to make
a decision on the batteries I’ll want.
I have 8 415W LG solar panels (though I may end up only using 4,
depending on how heavy the 2 tier rail system I’m designing gets), like
the ones listed here
https://www.solaris-shop.com/lg-neon2-lg415n2w-l5-415w-mono-solar-panel/
I want to store energy with about 4 used tesla model S lithium ion
batteries, as sold here:
https://www.evwest.com/catalog/product_info.php?products_id=463&osCsid=rp0cj2i33tp2j88tnj80dto4e5
It naively seems to me that this would work fine. But I’m concerned that
I’m missing something obvious. Is there something I’m missing or that I
should be looking out for?
Thank you!
With the proper BMS for the Tesla batteries and solar charge controller for the panels… those panels would indeed charge those batteries.
Nate, All new to me but sounds like the GameChanger will be a GameChanger!
Hey Nate, I was curious to know if this BBGC3 270AH battery would still work in place of the 100ah (4-6) batteries for the DIY camper solar wiring diagram 3000w inverter | 400-600ah | 400-1200w solar kit? I literally just bought everything today that you listed on the shopping list for this setup except for the 100ah batteries and 3000w inverter/charger. I am now just coming across this blog with the newest Battle Born batteries! I would much rather invest in 2 of these BBGC3 270AH batteries instead but I want to be sure I can still use the products, wires, etc. you listed for the setup that I already bought? I feel like I may not need as much wiring now but please let me now what differences in size or length of wiring I would need for this bigger battery and/or what other products I may need to replace instead of the ones listed in the 3000w inverter setup. I would love even better if you could do a wiring diagram setup just like the one above but with these batteries instead since I am following it step by step. Thank you so much for your help!
Yep! They would definitely work. The only change would be in quantities of wire lugs and heat shrink and potentially wire length from the “Battery Bank Wiring” Section of the ‘Detailed Parts List’. That section is set up for 6 batteries, so you just need to subtract out the heat shrink/wire/lugs as necessary for 2 batteries.
@Nate Yarbrough,
Great! I’m glad I haven’t bought the 100ah batteries yet then! They are still great but having less allows for more space on my garage.
So then, subtracting the amount of heat shrink/wire/lugs, I would just divide the qty you have listed by 6 which gives me the amount of each per battery. Then I would just double that for the new qty for 2 batteries instead correct? Thanks for your quick replies Nate!
Yep! Exactly. There is only 1 positive and negative battery to battery connection for 2x batteries, so it’d be 4x lugs, 2x red heat shrink, 2x black heat shrink, 1ft (ish) red/black wire.
Can’t wait to see a wiring diagram featuring the new GC3!
And can’t wait to have my GC3 arrive in the front porch!
Excellent news about BBGC3. Have to see if they can drop in behind a Renogy Rover.
They will! 🙂