
Ventilation in a Van/RV Electrical enclosure is important for the performance of the system. As chargers and other components work; they naturally put off heat and that heat must be able to escape the enclosure else overheating errors will occur. This blog post is going to teach you how to use the Cerbo GX to control computer fans that will turn on and off a certain temperature set points.
Victron Cerbo GX Fan Control – Parts Required:
- Victron Cerbo GX
- Victron Touch 70 GX
- 5A Inline Fuse
- 4A Fuse
- 16ga Red/Black Marine Wire
- Computer Fan
- Temperature Sensor
Notes about parts required:
- The Touch 50 GX can be used in place of the touch 70 GX. It is simply a smaller screen.
- If you are have a 12V Battery Bank, use 12V computer fans. If you have a 24V battery bank; use 24V computer fans. If you try to connect 12V computer fans to a 24V battery bank without a step-down converter; you will damage the fans.
- The max amperage that can flow through the relay of the Cerbo GX like we will be using is 4A. Computer fans generally operate at less than 1 amp, but please verify that the total fan load, even when using multiple fans, does not exceed 4A.
- If you have a Victron Multiplus and are using batteries with a built in BMS; the temperature sensor that comes with the multiplus is likely not used and can be ‘stolen’ and repurposed for this project. If you do not have a Multiplus or your temperature sensor is in use; the sensor can also be purchased seperately
Advertisement:
Victron Cerbo GX Fan Control – Diagram
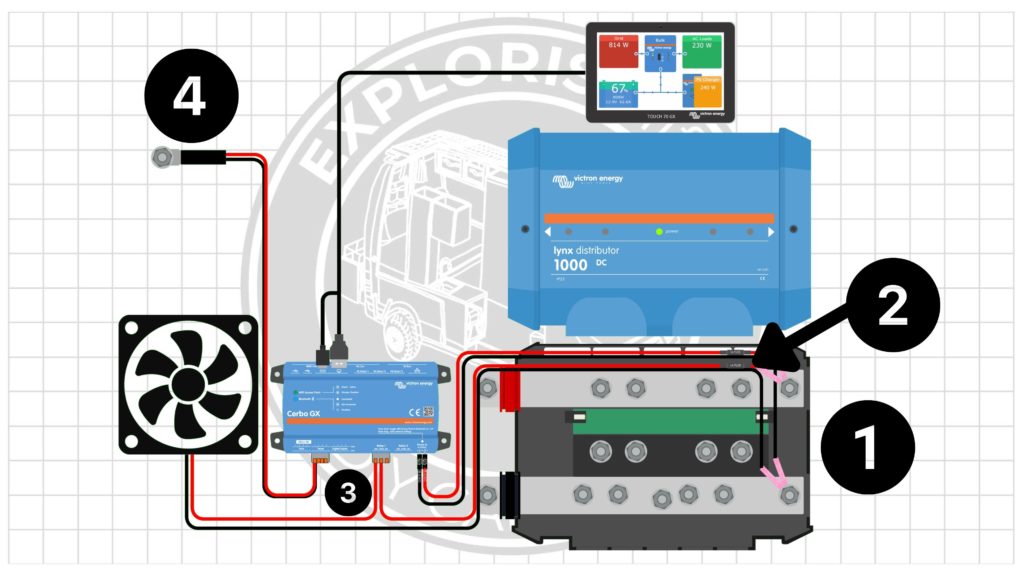
- Two power connections are necessary, both of which will normally come from the far right stud of the Lynx Distributor which is powered by the battery bank:
- Power delivered to the Cerbo GX
- Power delivered to the fan
- There must be a fuse in place to protect the wire coming from the Lynx Distributor, through the Cerbo, and to the fan. Use a 3-4A Inline fuse (listed in parts needed section above) for this.
- The power circuit is a standard ‘positive to positive and negative to negative’ circuit with the positive wire being ‘broken’ into the Cerbo GX Relay 1 port. Power from Lynx Distributor to the ‘com’ port and from the NO (normally open) port. The wires simply push into the included terminals from the Cerbo GX.
- Temperature Sensor. This can be fastened wherever you want the temperature to be taken. It does indeed look like a wire lug; but it does not need to be connected to anything electrical. Screwing this to the wall at the top of your electrical enclosure is a good idea for this project. The red and black wire go to temperature port 1 of the Cerbo GX with the red wire on top and the black wire on bottom.
Advertisement:
Victron Cerbo GX Fan Control – How it works
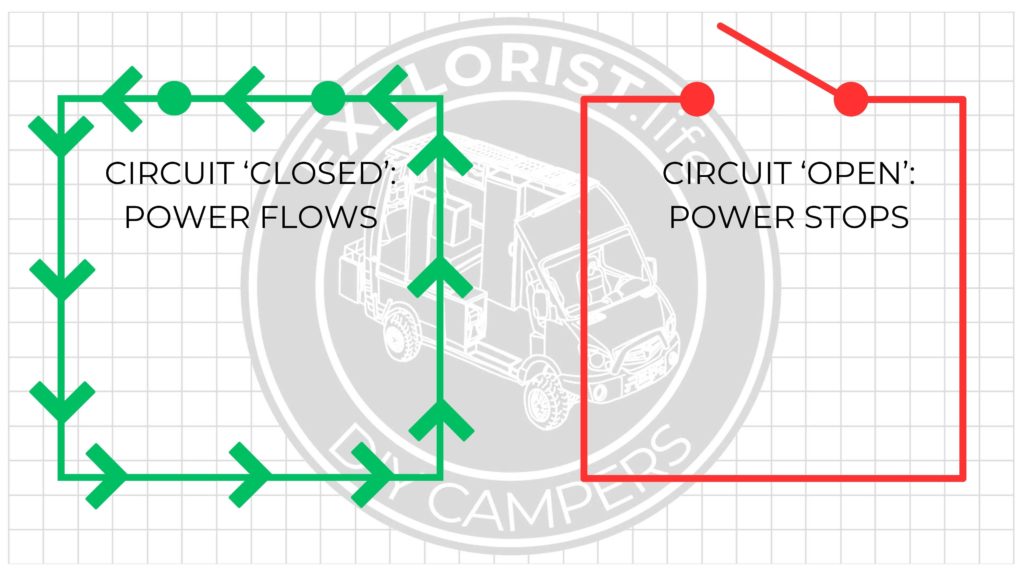
The ‘relay’ port of the Cerbo GX is simply an on/off switch and connects/disconnects the wires connected to it based on the parameters we will program it for in the following steps. We are delivering power to ‘com’ (common), and power is coming out of the NO (normally open) terminal to the fans.
This means that the circuit is normally ‘open’, aka power is not flowing; and when the Cerbo flips the ‘switch’ -> the circuit closes -> and allows power to flow.
Advertisement:
Victron Cerbo GX Fan Control – Programming
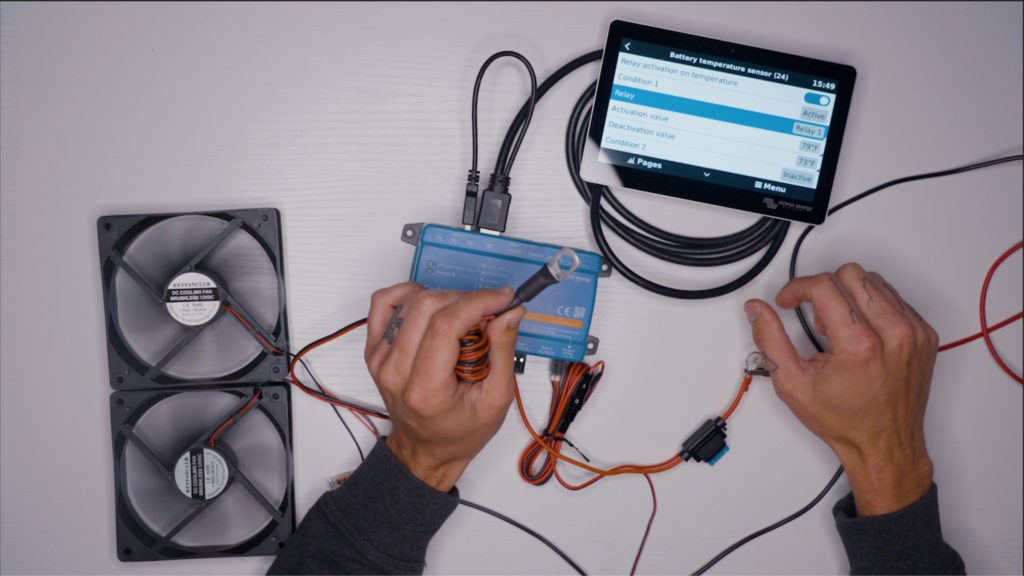
Once everything is connected properly, you need to use the Touch 50/70 screen to activate the relay and set it to turn on/off at whatever temperatures you like. Once the Cerbo and Touch 70 is turned on and booted up, follow these steps within the Touch 70 Menu to activate & program the relay.
- Tap screen -> Menu -> Settings -> I/O -> Analog Inputs -> Turn ‘on’ Temperature Input 1
- Back out twice to main Settings screen
- Tap ‘Relay’ -> Tap Function (Relay 1) -> Temperature -> Checkmark
- Temperature Control Rules -> Tap Battery Temperature Sensor -> Relay activation on Temperature to ON -> Tap Relay & set to Relay 1 -> Set the Activation Value to whatever temperature you want the fan to turn on at -> Set the deactivation Value to whatever temperature you want the fan to turn off.
Understanding the significance of ventilation in a Van/RV electrical enclosure is crucial to maintaining optimal system performance. As electronic components, like chargers, operate, they generate heat that must be effectively managed to prevent overheating issues. This blog post has equipped you with the knowledge to utilize the Cerbo GX for controlling computer fans, ensuring your system remains within safe temperature ranges.
