This blog post will teach you how to program a solar charge controller to deliver a proper charge profile to your battery bank.
Now… What is a charge profile? Well, there are MANY different battery chemistries on the market. Lead Acid, AGM, and Lithium Iron Phosphate are three of the most common ones seen in camper electrical systems… and each one wants to be charged just a little differently.
One may want to be charged at 14.2V where the next one wants to be charged at 15.1V.
One battery may need a higher voltage charge when it’s cold when the next battery doesn’t care what temperature it is.
One battery may need to be charged slower the closer it is to full and the next battery may be able to be charged at a constant rate.
How to Program a Victron SmartSolar Charge Controller
The Victron SmartSolar charge controllers can be most easily programmed by using the VictronConnect app on any smartphone. Once the app is downloaded to your device and installed, make sure your bluetooth on your phone is turned on and navigate to the battery settings menu.
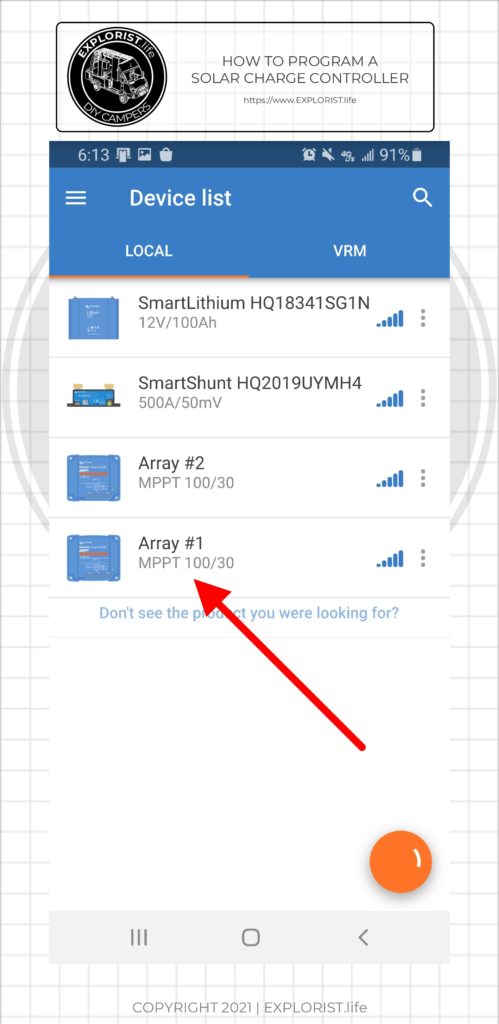
Click on the charge controller that you would like to program.
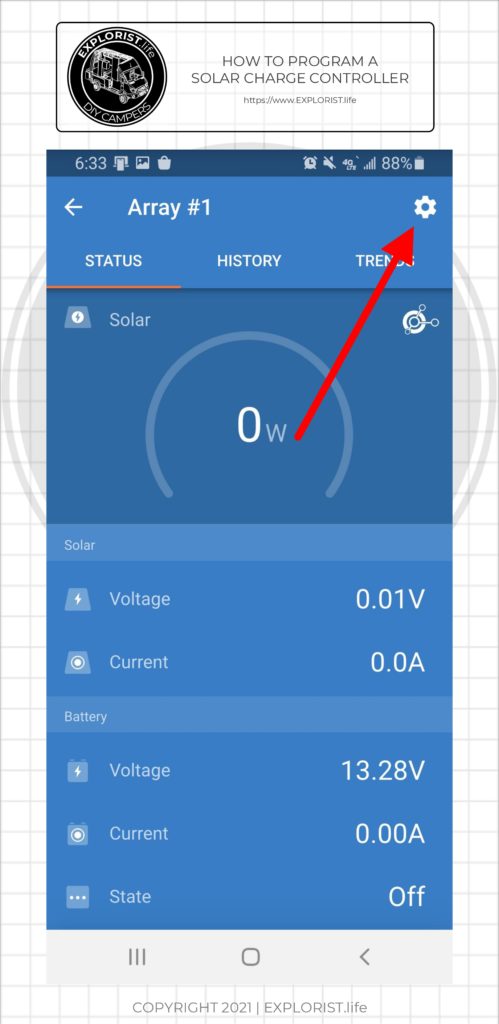
Click on the cog icon in the upper right part of the screen:
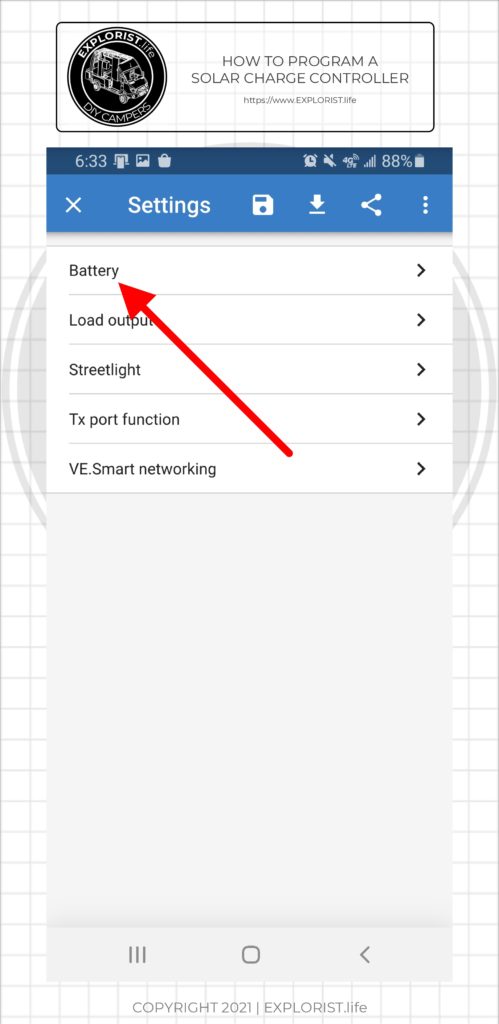
Click the ‘Battery’ menu to access the battery settings menu.
And fill in the values as appropriate for the specific battery bank that you are programming the charge controller for. The example below is the recommended values for Battle Born LiFePO4 Batteries.
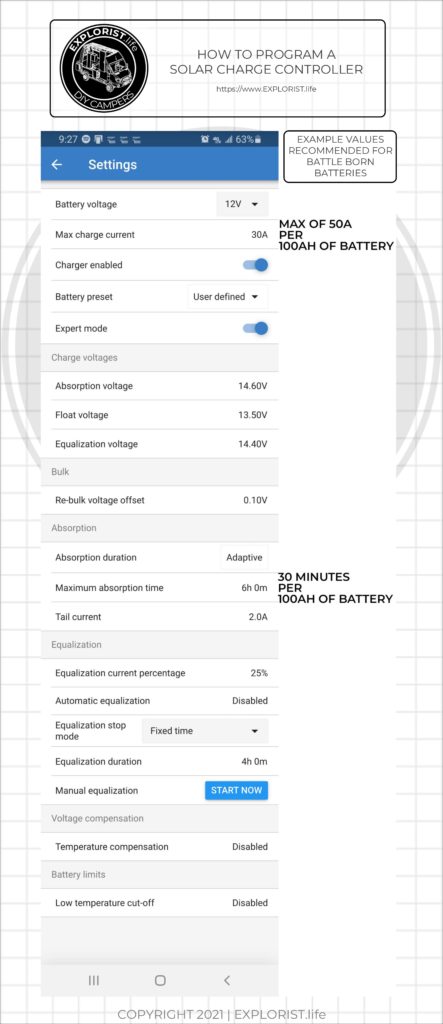
How to Find the Best Charging Settings for Your Batteries
Although there are general charging parameters recommended for the various chemistries of batteries, it’s always a good idea to get the recommended charging values for your batteries directly from the manufacturer of your batteries as the recommended charging values can vary depending on the brand.
MOST battery manufacturers have their recommended charging values listed on their website or on the product info sheet, but if this is not available, you should email their customer support and ask them this:
Recommended Battery Charging Parameters Email Template
Hey {Battery Company} Team! I have purchased {Qty} of your batteries and am wiring them into a {12V/24V/36V/48V} battery bank and I am looking for some information on what the proper charging parameters are for your batteries. I am charging with the Victron SmartSolar charge controller and here is a list of the charging parameter values I can change:
Absorption Voltage:
Float Voltage:
Equalization Voltage:
Re-Bulk Voltage offset:
Absorption Duration: (Adaptive/Fixed)
Maximum Absorption Time:
Tail Current:
Equalization Current Percentage:
Automatic Equalization: (Disabled / Equalize every ____ Days)
Equalization stop mode: (Fixed Time / Automatic on Voltage)
Maximum Equalization Duration:
Temperature Compensation (mV/°C):
Low-Temperature Cutoff (optional):
I’ve attached a screenshot of the battery settings page from the Victron Connect App for your reference
Would you please let me know what you recommend for these settings, please?
Thanks so much!
An EXPLORIST.life Superfan,
Consider putting your name here

Feel free to save this image and attach it to the email above. Also… If you get a response from your battery company with the recommended parameters and want me to add it to this page, please forward your correspondence with the manufacturers recommended parameters to Nate@EXPLORIST.life.

6 Responses
This is what I received from Renogy for 2 200ah agm batteries. I hope this covers all my needs. I plan to set this up soon. Thanks for the info and help, you all rock!
Battery info
Battery. Agm
High Voltage Disconnect.. 16V
Equalization Voltage 14.6 V
Boost Voltage14.4 V
Float Voltage 13.8 V
_………….
Boost Return Voltage 13.2 V
Low Voltage Reconnect 12.6 Ÿ
Under Voltage Warning 12.0 V
Discharging Limit Voltage 10.6 V
Over-Discharge Delay. Time. 5 s
Equalization Duration. 2 hours
Equalization Interval. 30 Days
Boost Duration. 2 hours
Best regards,
Rich
Renogy 200ah Lithium battery w bluetooth:
Their reply was,
“Please set the Absorption Voltage to 14.4V.
The rest of the settings are not applicable to Renogy lithium batteries.”
Not sure if I believe that is all it cares about.
So I messaged their chat support and received a different answer.
“The recommended charging settings for 12V lithium batteries are listed below.
Absorption voltage* (V): 14.2
Float voltage* (V): 13.5
Equalize** voltage* (V) : n/a
Equalize** nominal current percentage: n/a
Temperature compensation factor* (mV/°C): 0”
If someone else gets a different answer or has already set these parameters please let me know! Or at least this will give someone a start of where to begin.
Thank you!
SOK 12v 206ah
https://www.us.sokbattery.com/
Settings for Victron MPPT Charge Controllers:
Battery Voltage: Set depending on system, normally 12v.
Max Charge Current: OK to set as high as desired, but no more than 50a per battery
Charger: Enabled
Battery Preset: User Defined
Expert Mode: ON
Absorption Voltage: 14.6v
Float Voltage: 13.8v
Equalization Voltage: 14.6v
Rebulk Voltage Offset: 0.40v
Absorption Duration: Fixed
Absorption Time: 15 Minutes (This allows for proper cell balancing)
Tail Current: Disabled Equalize Current: 0% (For safety we don’t want equalization at all.)
Automatic Equalization: Disabled
Equalize Stop Mode: Automatic (On voltage)
Maximum Equalize duration: 0 Minutes
Manual equalization: DO NOT CLICK START
Temperature Compensation: Disabled
Low Temperature Cutoff: Disabled (unless you add a temp sensor, the BMS has this protection built in)
Thank you for all the videos. They are very helpful. Can you tell me the settings for an EPEVER 40a/100V MPPT solar charge controller with 2 100ah ampere time LiFePO4 batteries with built in BMS.
As mentioned in the blog post, you’ll want to reach out to the tech support for the batteries you’ve chosen for their proper charging parameters.
Keep up the good work Sir!
Greetings from Oz.