
Wiring high-output DC-DC chargers can feel intimidating—especially when you’re trying to figure out wire sizes, fuse ratings, lug types, and how everything connects to your vehicle and house battery system. Fortunately, the REDARC BCDC Alpha 100 R paired with the REDARC BCDC Alpha 100 R Wiring Kit takes out nearly all the guesswork.
In this post, we’ll walk you through the complete wiring process for the Alpha100 R, explain what makes the REDARC BCDC Alpha 100 R Wiring Kit unique, and show you how everything ties together into a clean, safe, and efficient install.
How to Wire a REDARC BCDC Alpha 100 R (Step-by-Step Install Guide) VIDEO

🔧 The Components You’ll Be Working With
Before diving in, here’s what the typical setup includes:
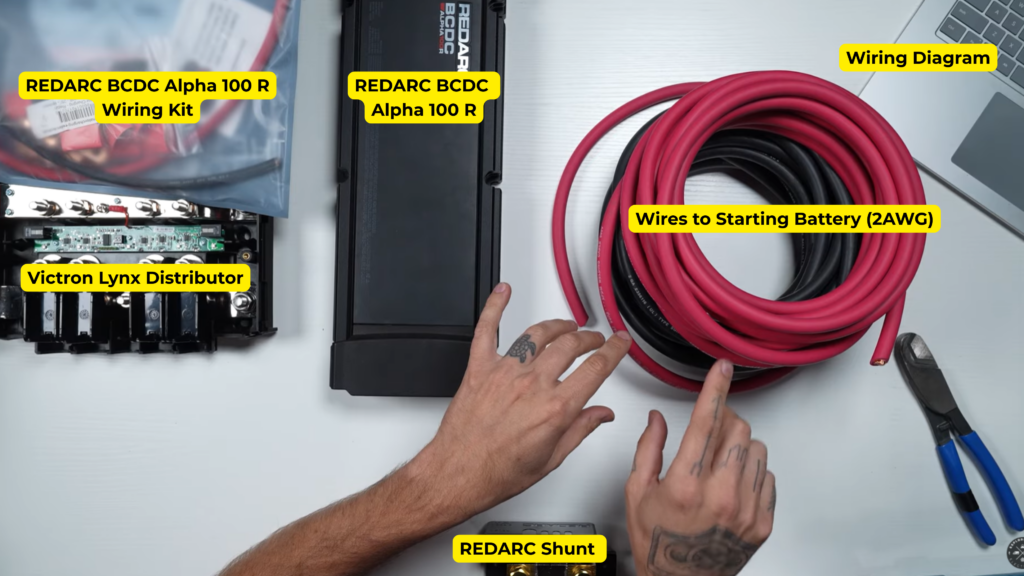
- REDARC BCDC Alpha100 R
- REDARC shunt & data cables (included with the charger)
- REDARC BCDC Alpha 100 R Wiring Kit for the Alpha100 R
(correct wire sizes, lugs, heat shrink, fuses, parallel splice connectors, mounting hardware) - Victron Lynx Distributor connected to your house battery bank
- Starter battery / alternator on the vehicle side
- Wiring Diagram (included when purchasing the kit)
The great part of the REDARC BCDC Alpha 100 R Wiring Kit is that you don’t need to figure out wire sizes or lug types—we ship the correct components pre-selected for your specific kit length.
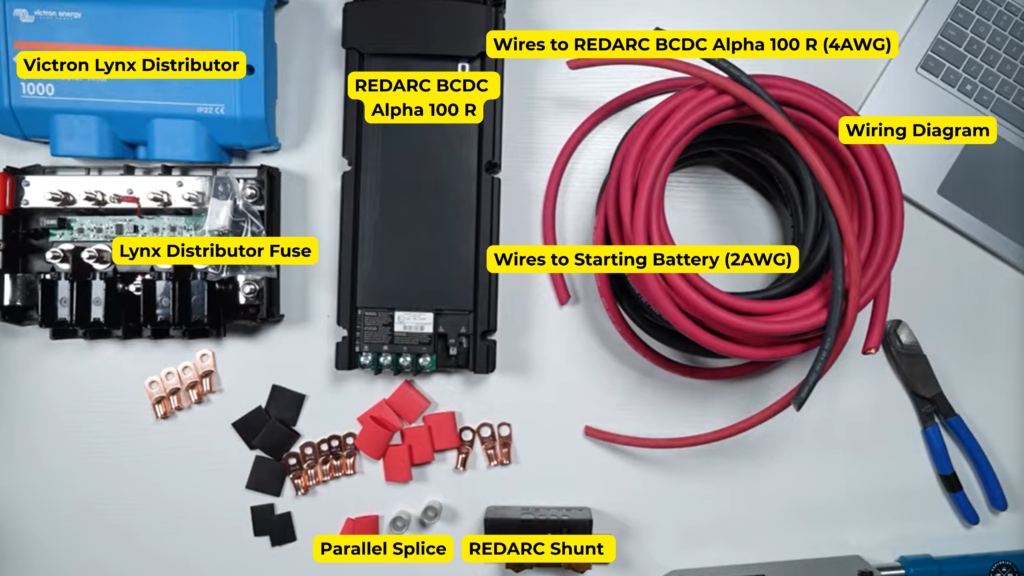
Why the REDARC BCDC Alpha 100 R Wiring Kit Matters
One of the biggest challenges with the BCDC Alpha100 R is that REDARC limits the terminal size to a maximum of 4 AWG, even though a 100-amp charger ideally needs larger wire running to the starter battery. This means you need a reliable, safe way to transition from the larger gauge wire to the 4 AWG pigtails that attach to the charger itself.
The REDARC BCDC Alpha 100 R Wiring Kit includes:
- 2 AWG Red Wire
- 2 AWG Black Wire
- 4 AWG Red Wire
- 4 AWG Black Wire
- 2 AWG x 5/16″ Wire Lug
- 2 AWG x 1/4″ Wire Lug
- 2 AWG x 3/8″ Wire Lug
- 4 AWG x 1/4″ Wire Lug
- 4 AWG x 3/8″ Wire Lug
- Parallel Splice Connectors
- 3/4″ Red Heat Shrink
- 3/4″ Black Heat Shrink
- 1/2″ Red Heat Shrink
- 1/2″ Black Heat Shrink
- 150A MEGA Fuse
- Mounting Screws
Every item is labeled and matches the wiring diagram we provide.
How to Wire the REDARC BCDC Alpha 100 R

Step 1: Build the Charger-to-Shunt Wires
Start by making the short positive and negative leads that run from the BCDC charger to the REDARC shunt:
- Cut the black wire to length.
- Crimp on the appropriate wire lug.
- Heat-shrink the connection.
- Repeat for the red wire.
This prepares the BCDC to connect properly to its included shunt, which is essential for the Alpha100 R’s monitoring capabilities.
Step 2: Prepare the Main Power Wires
These are the wires that handle the heavy lifting—delivering power between the:
- Starter Battery → BCDC Alpha100 R
- BCDC Alpha100 R → House Battery (via the Lynx Distributor)
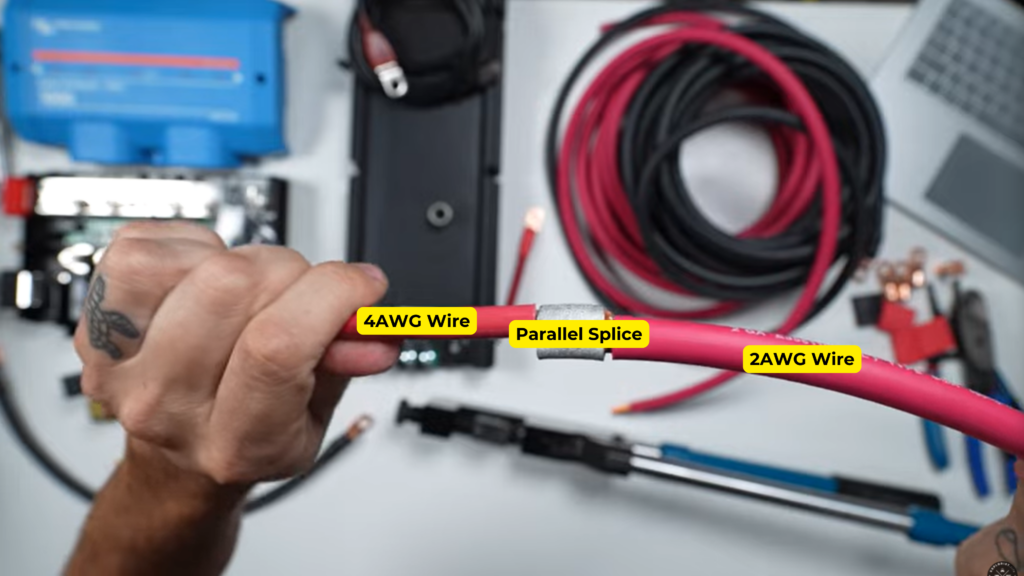
All standard lugs are crimped on as usual—but the unique part of this install is transitioning from large-gauge wire to 4 AWG for the charger. 4AWG 105°C wire is rated for 160A and can carry the full current. The larger wire is simply used to decrease voltage drop to an appropriate level.
Using Parallel Splice Connectors
Because REDARC only accepts 4 AWG at the charger terminals, you’ll use the included parallel splice to safely reduce the wire size:
- Strip both ends of the wires.
- Insert large gauge wire into one end of the splice.
- Insert the 4 AWG wire into the other.
- Ensure no strands are left out.
- Crimp the splice just like a heavy-duty lug.
- Heat-shrink for protection.
This method is manufacturer-recommended and ensures a robust mechanical and electrical connection.

Step 3: Wire the Victron Lynx Distributor
This is where your system connects to the house battery bank.
- Attach the negative wire directly to the Lynx negative busbar
(no washer between the lug and busbar). - Attach the positive wire to the lower stud.
- Add the fuse directly on top—again, no washers between fuse components.
- Secure using washer, lock washer, and nut.
- Torque properly (or use your “torque elbow,” as Nate jokes 😄).
Your Lynx is now fully wired for power flow to and from the BCDC Alpha100 R.
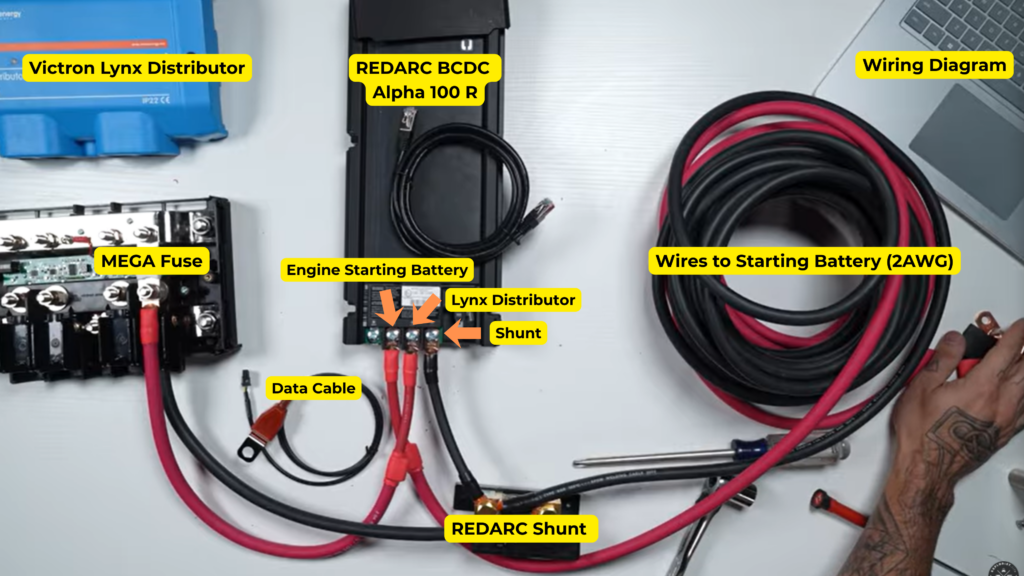
Step 4: Connect the BCDC Alpha100 R
Across the front of the REDARC unit, you’ll find:
- Solar input (ignored for this tutorial)
- Vehicle/Starter Battery input
- House Battery output
- Negative connection to the shunt
Wire them as follows:
- Vehicle Input → Starter battery (through your breaker)
- House Output → Lynx Distributor positive busbar
- Negative → REDARC shunt
- Shunt → Lynx negative busbar
The starter battery wires get their lugs crimped on last so you can cut to vehicle-specific length during installation. If you purchase the pre-crimped kit, these come ready to go.

Step 5: Add the REDARC Data Cables
The Alpha100 R includes data and sense wiring to support its battery monitoring functions.
You’ll connect:
➤ Battery Sense Lead
- One end → Lynx Distributor positive busbar
- Other end → REDARC shunt
➤ Communication Cable
- Runs between the charger and shunt
These plug into the only ports they fit, making setup straightforward. REDARC’s manual provides detailed explanations of what each cable does, but here we’re focusing strictly on where they go.
Step 6: Secure & Manage Wiring
Once everything is connected:
- Mount the charger, Lynx, and shunt using the supplied screws
- Add wire clamps for strain relief
- Route wires cleanly along your backer board or enclosure
This step is essential for preventing vibration-related failures—especially in mobile and off-road environments.
Final Thoughts
This installation is surprisingly simple once you understand the flow of power:
Starter Battery → BCDC Alpha100 R → Lynx Distributor → House Batteries
The REDARC BCDC Alpha 100 R Wiring Kit exists to remove all the complexity—no guessing wire sizes, hunting for the right lugs, or making extra hardware store runs. Everything is sized, labeled, and matched to the wiring diagram.
If you don’t want to crimp anything yourself, we even offer a pre-crimped version or can install it for you at our shop in Bend, Oregon.
Whether you’re upgrading a van, RV, boat, or overland rig, the REDARC BCDC Alpha100 R is a powerful, clean solution for alternator charging—and with the right wiring kit, it’s easier than ever to install.